Quick Start Guide CloudRail.Box Max and CloudRail.Box
Thanks a lot for choosing the CloudRail solution. This guide will help you to get started with the on-boarding process.
1. Connecting the CloudRail.Box Max/CloudRail.Box
The CloudRail.Box Max is supplied with power cable. If power supply is not ordered, then you can connect it to any power supply of specification : 24V, >1amp.
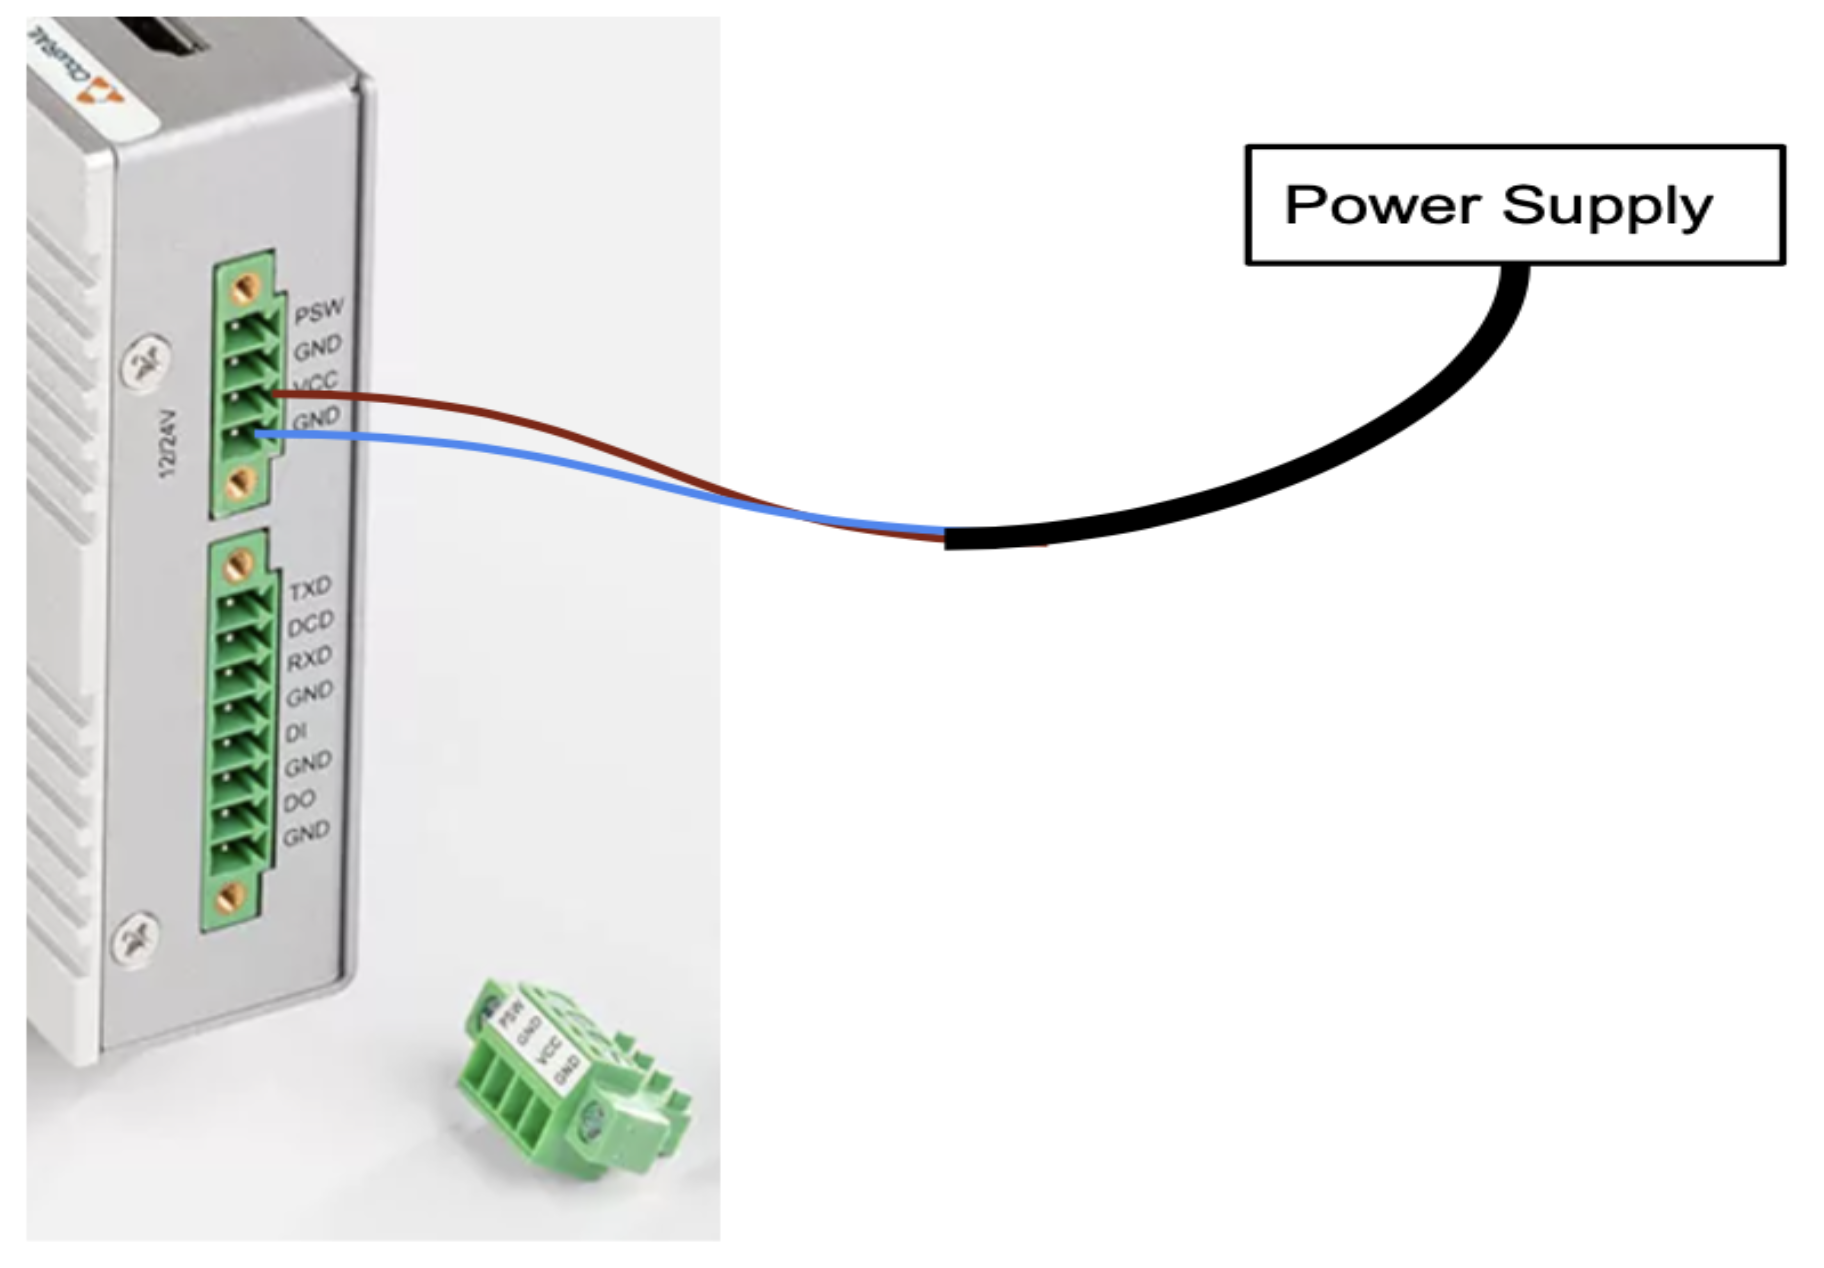
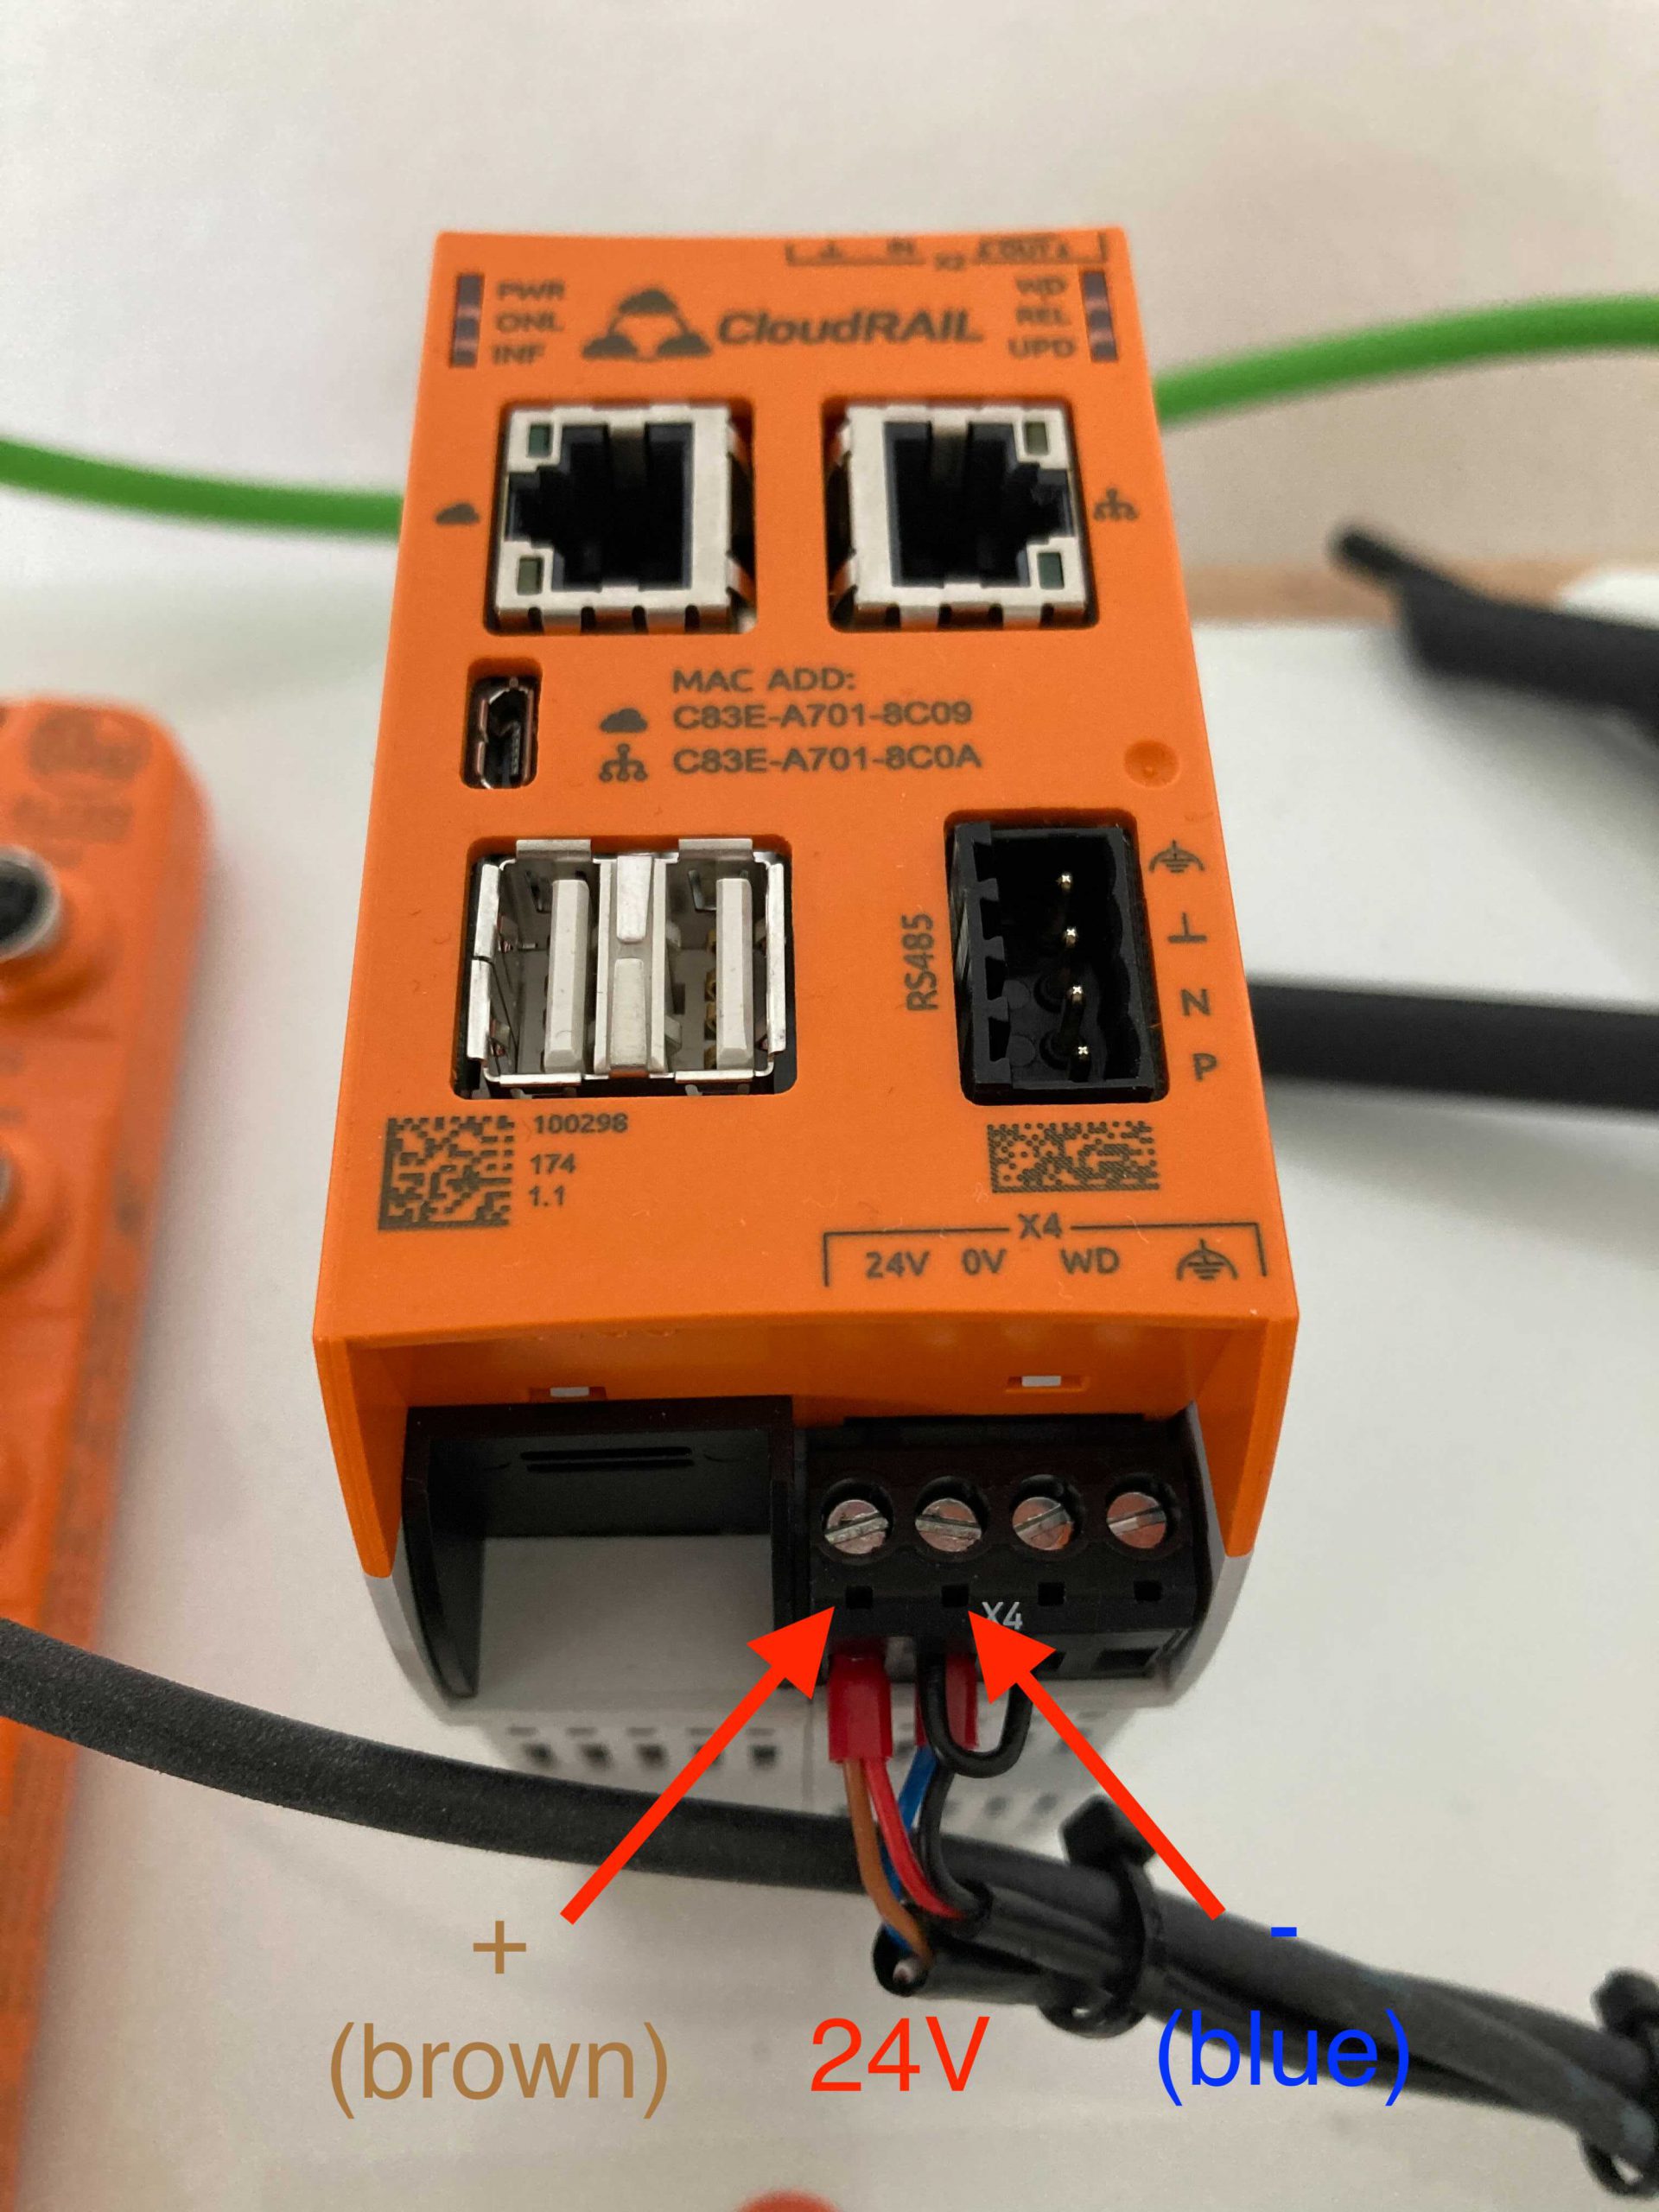
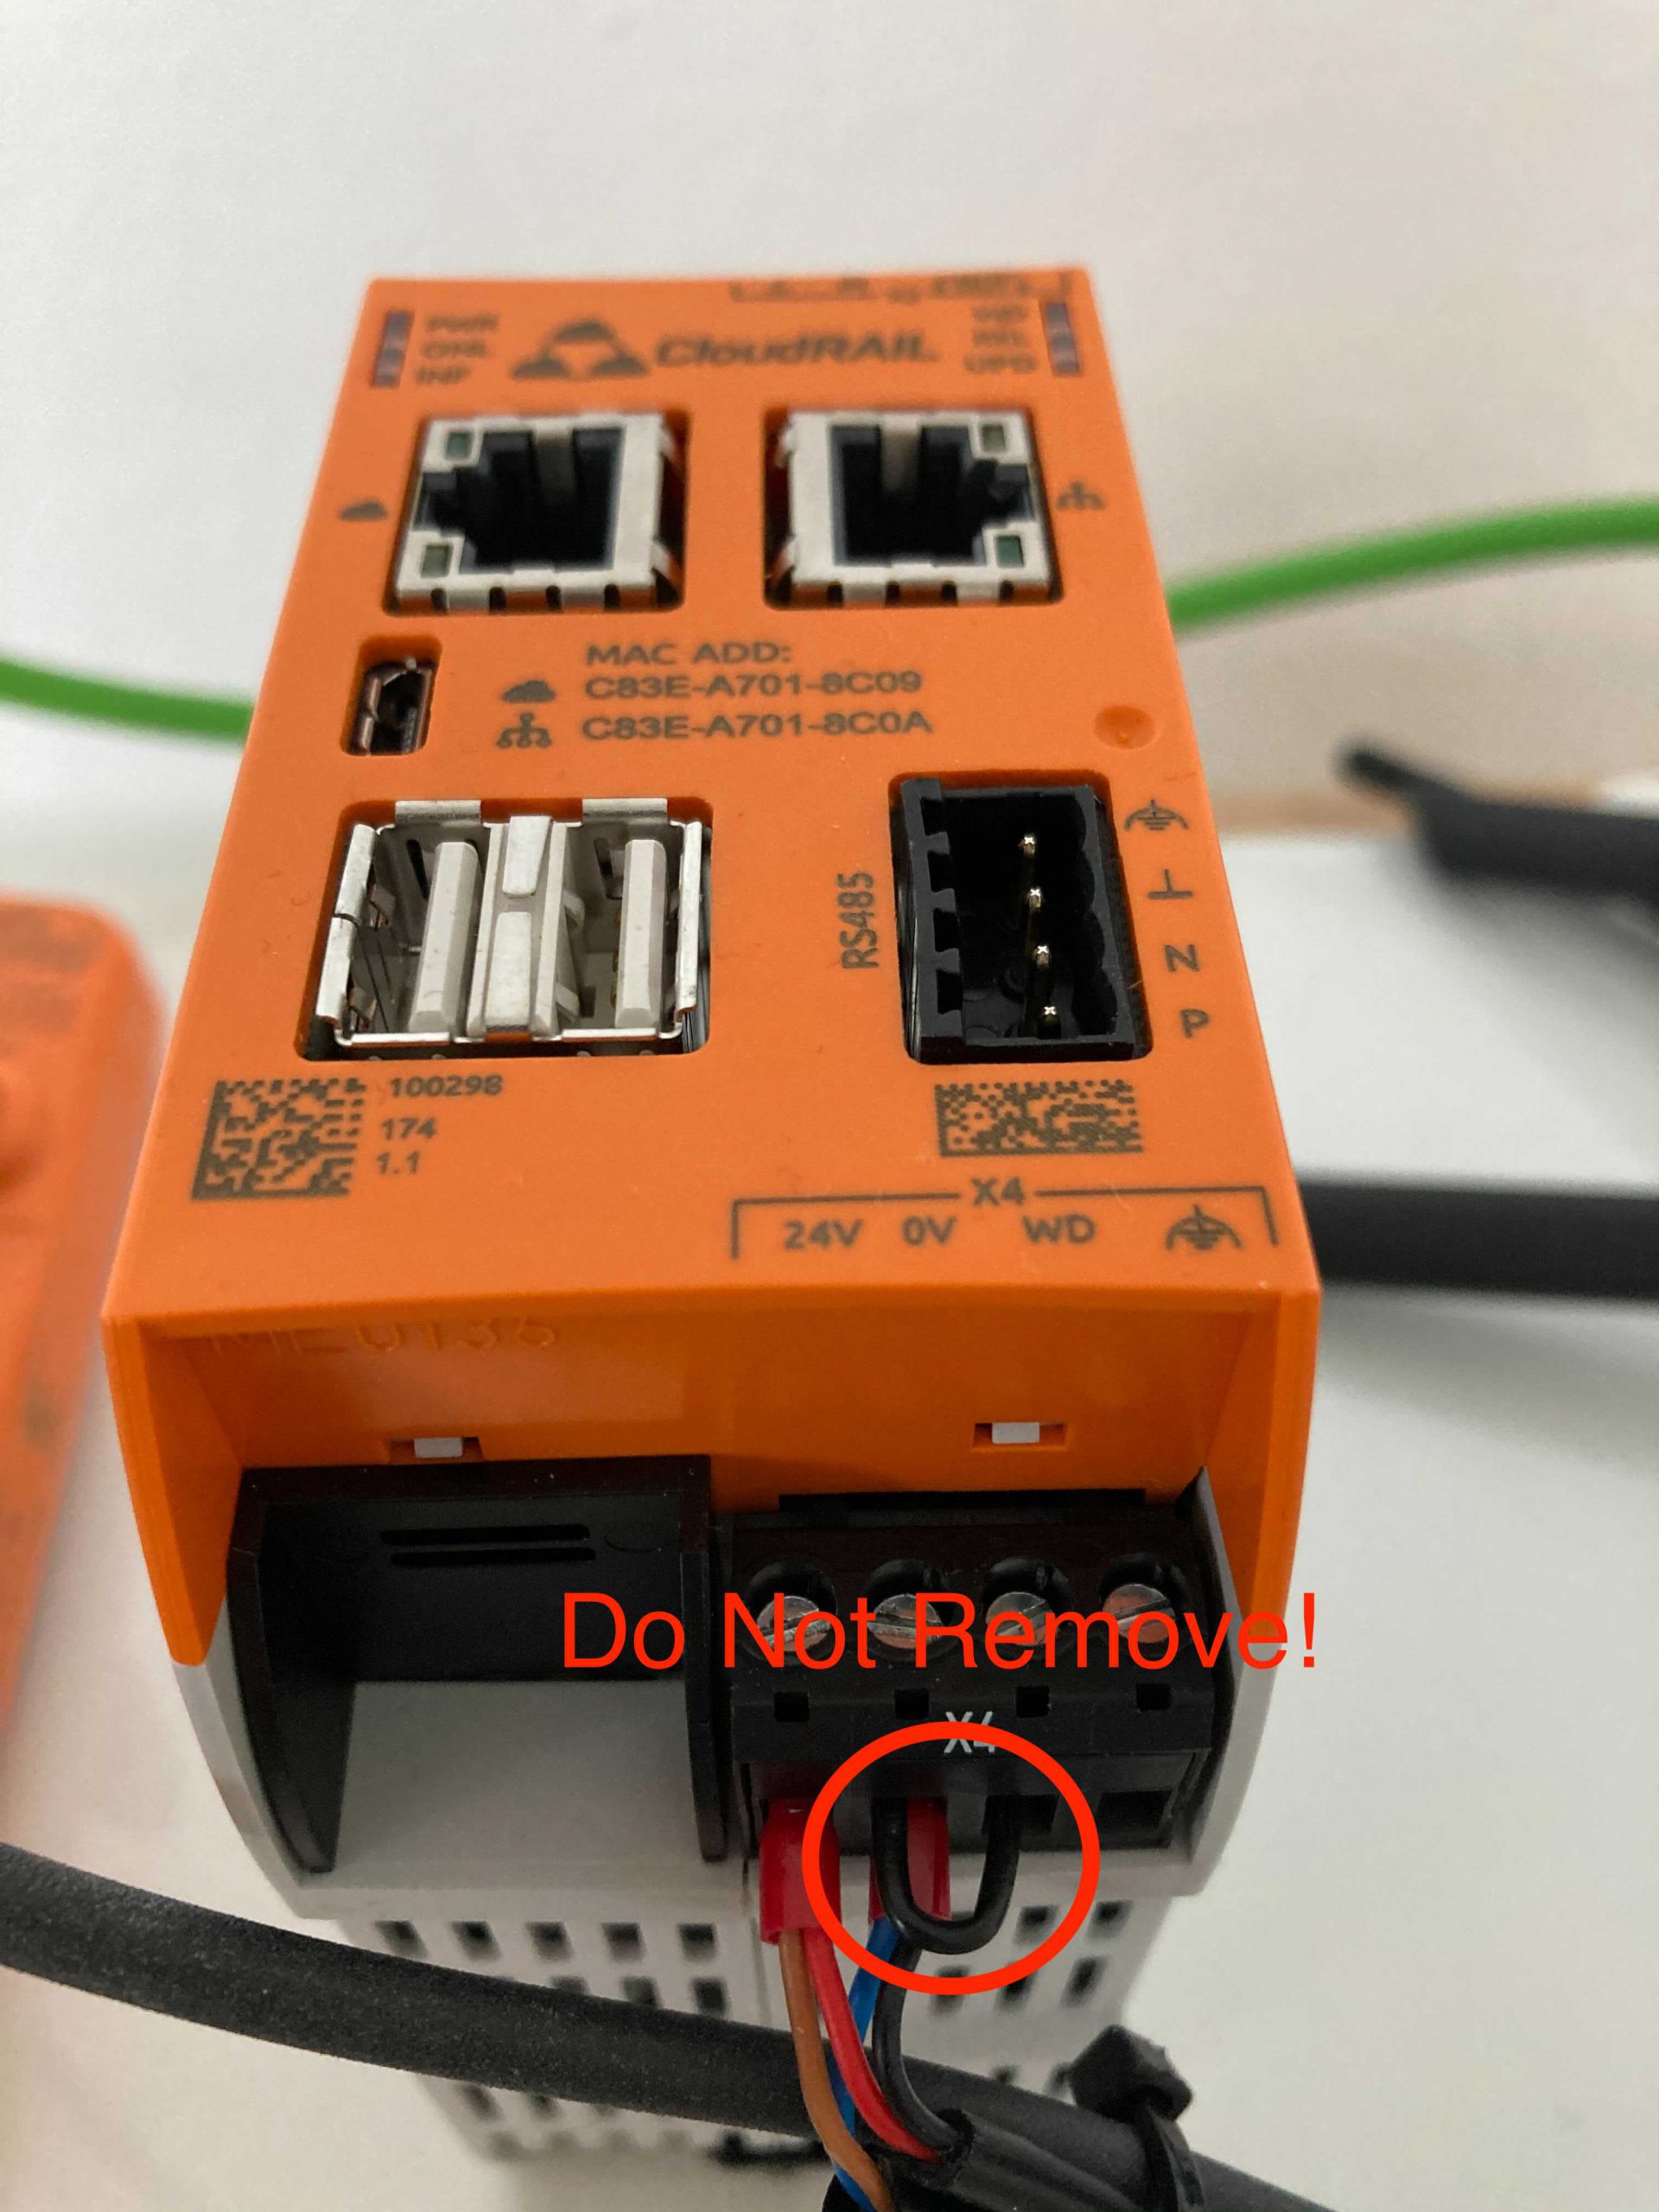
Connect the loose ends of the power cable to a 4 pin terminal connector and plug it into the CloudRail.Box Max. Make sure +24V is connected to ‘VCC’ and grounding cable connected to ‘GND’. Please confirm this wiring sequence and then only connect it to a suitable power supply of 12-24V and turn ON the power supply.
As shown in picture, brown cable is +24V connected to ‘VCC’ pin and blue cable is grounding connected to ‘GND’ pin of 4 pin terminal connector.
*Note: Do not swap the cables. Connect the correct wiring sequence as mentioned above otherwise it may lead to a serious damage of CloudRail.Box Max.
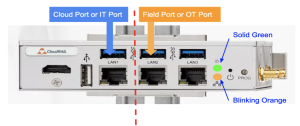
Now connect the CloudRail.Box Max to the internet using the LAN1 port of the CloudRail.Box Max. If the CloudRail.Box Max is able to establish a connection to the Management Cloud, the status of CloudRail.Box Max will be “Online”in the CloudRail’s Device Management Cloud.
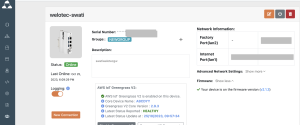
If the status in CloudRail’s Device Management console is Offline then there might be a problem with the internet connection. By default the CloudRail.Box Max uses DHCP to get an IP address. If DHCP is unavailable in your network, please add the CloudRail.Box Max to the Device Management Cloud (Step 2), select it and click “Advanced Network Settings” to get instructions on manually setting the network configuration.
The CloudRail.Box Max uses MQTTs and HTTPs for communication to the Device Management Cloud as well as the Cloud Platforms. Make sure that your network firewall allows communication through ports 443 and 8883.
2. Linking the CloudRail.Box Max to the Device Management Cloud
In the next step, you need to add the CloudRail.Box Max to the CloudRail’s Device Management Cloud. This is the place where you configure and manage all your devices.
Create an Account
Please visit https://devices.cloudrail.com/signup to create a new account. After you fill out all necessary fields, an email will be sent to you, which you need to confirm.
Link Your CloudRail.Box Max
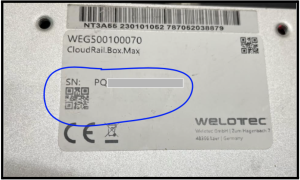
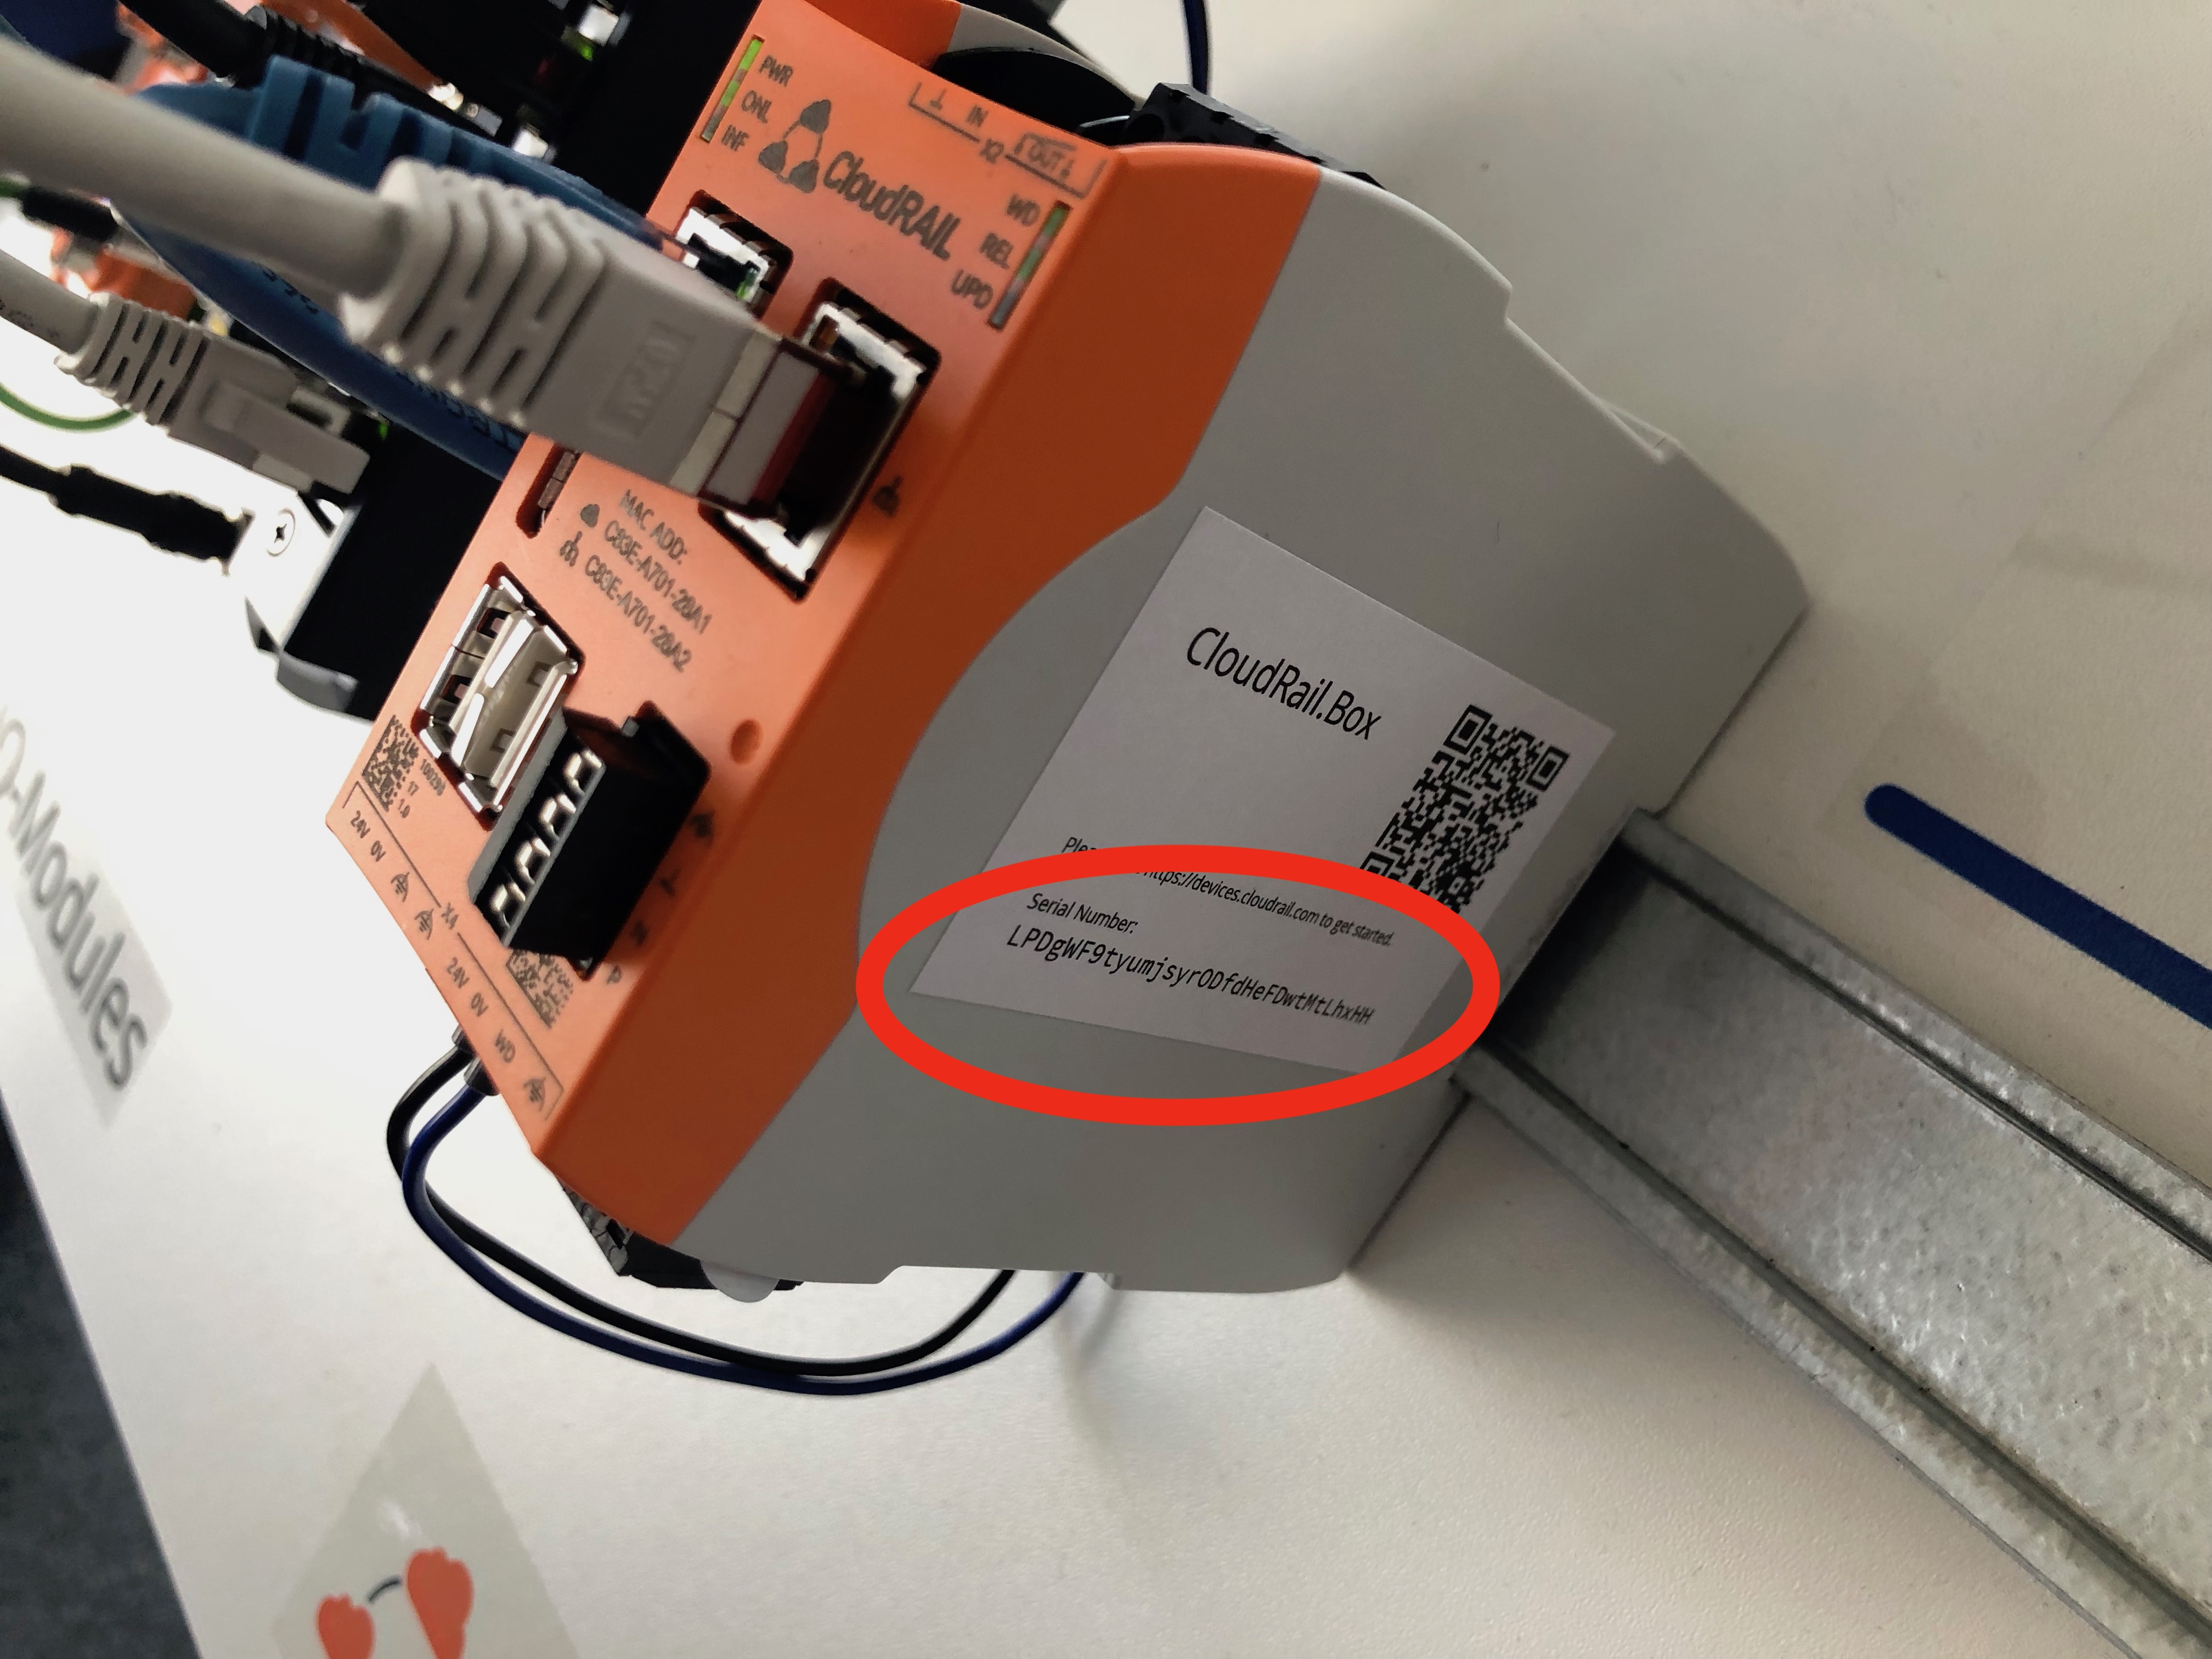
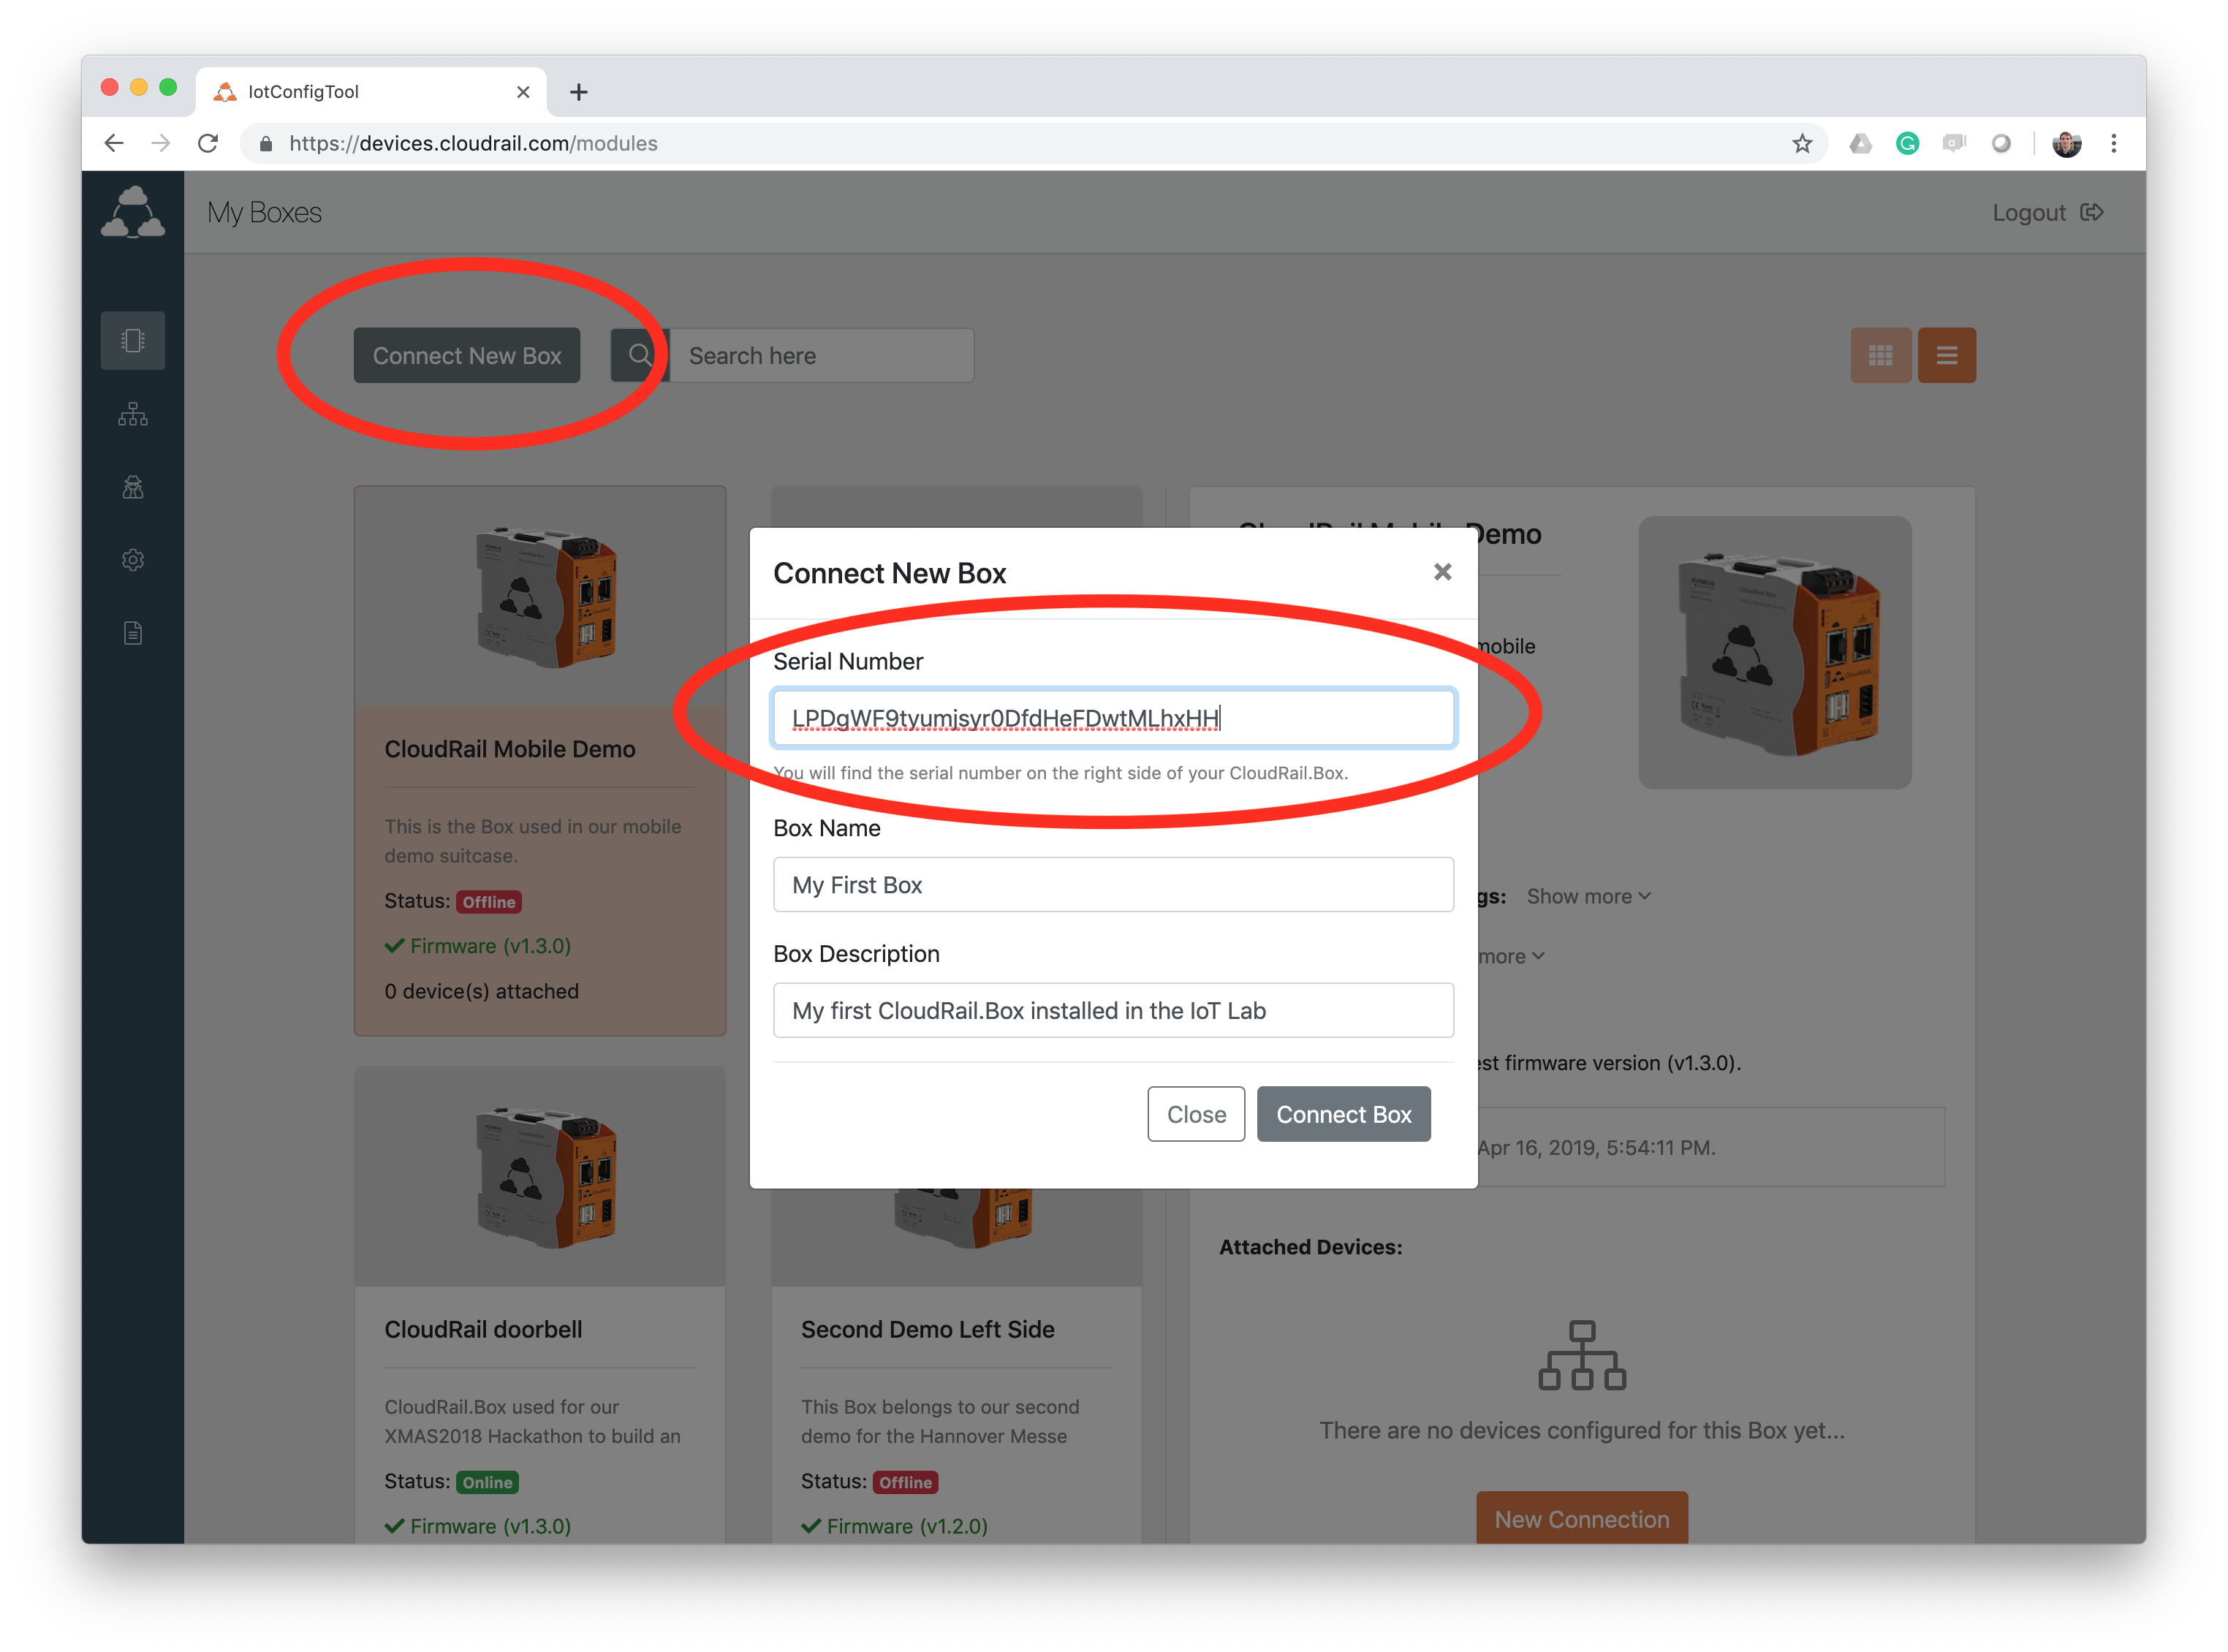
Please log in to your account on https://devices.cloudrail.com, click on “Connect New Box” and enter the serial number of your CloudRail.Box Max. You’ll find this number on a label located on the bottom side of the CloudRail.Box Max. Moreover, give the CloudRail.Box Max a name and short description to identify it later.
Alternatively, you can just scan the QR code with a suitable QR-code reader.
3. Update the Firmware (Important)
Firmware updates ensure that your CloudRail.Box Max is always working properly and is secure. You can check firmware version of your CloudRail.Box Max on details page. If the version is old, then you can update it to latest version by contacting support@cloudrail.com.
This can take several minutes and the CloudRail.Box Max might restart multiple times.
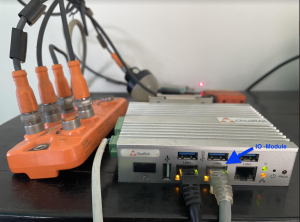
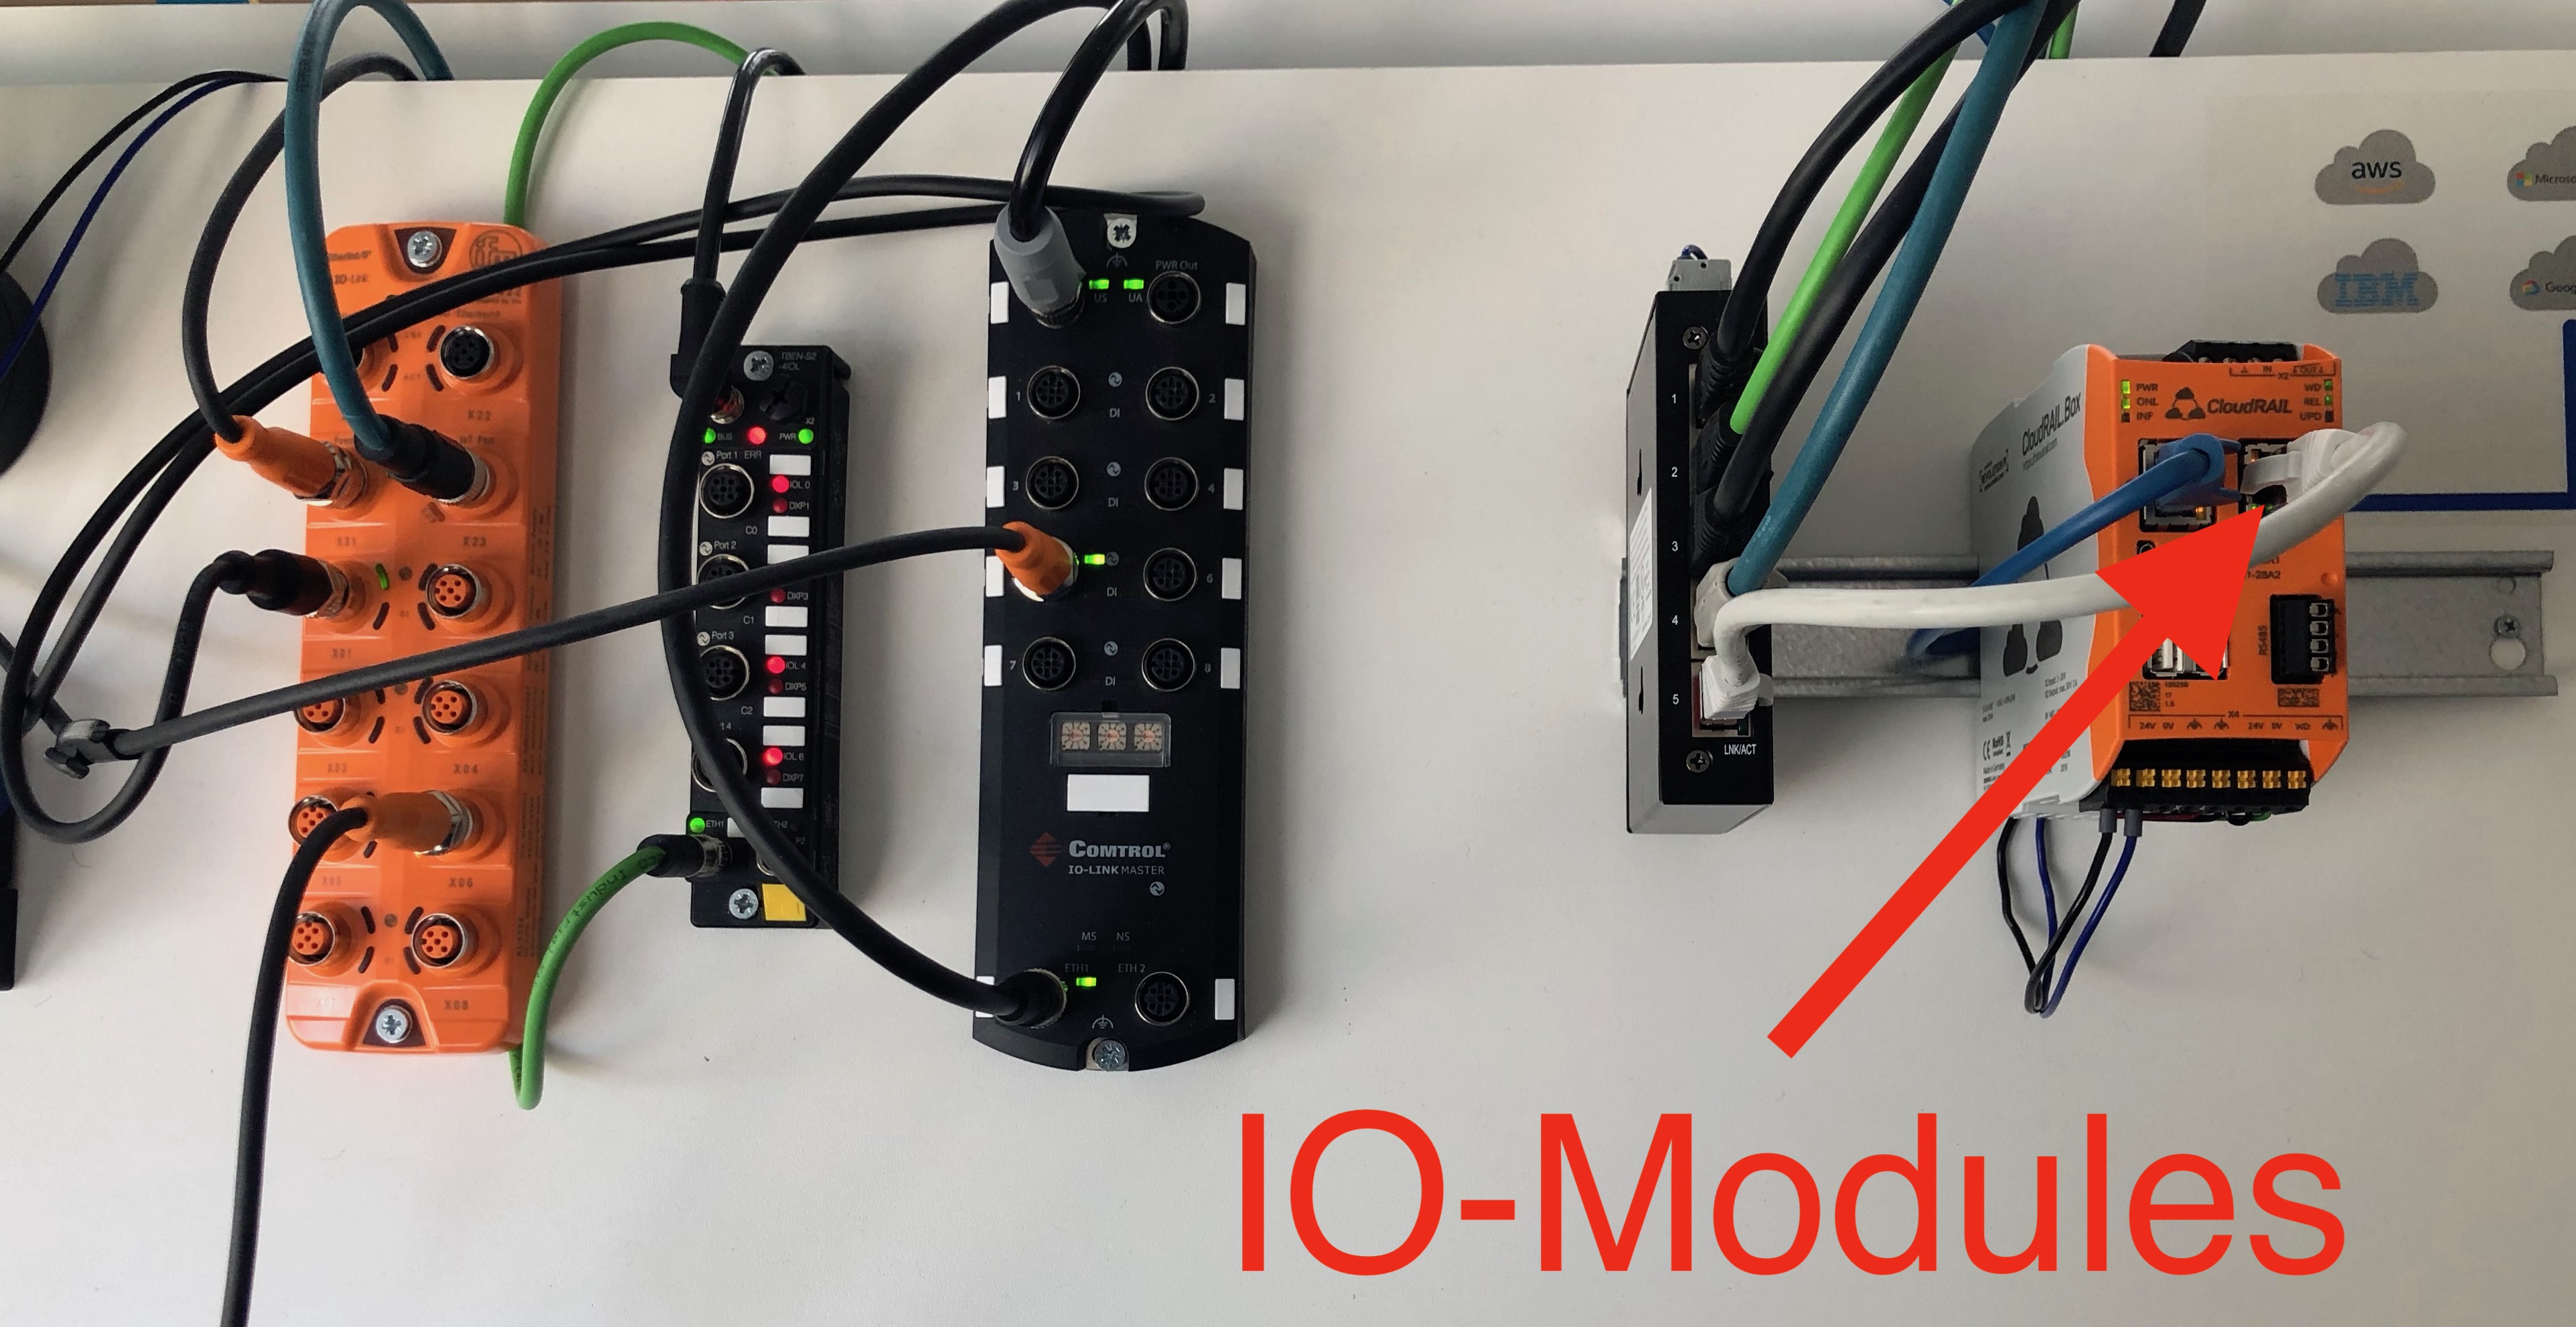
4. Connect your IO-Link Master
Now connect your IO-modules to the LAN2 port for the CloudRail.Box Max. A list of compatible IO-modules can be found here. Make sure to reset the IO-module to factory settings if it was connected to another system before.
In the first step connect the CloudRail.Box to a suitable 24V power supply.
Now connect the CloudRail.Box to the internet using the left ethernet port (Cloud Port). If the CloudRail.Box is able to establish a connection to the Management Cloud, the “ONL” LED will turn green. This might take up to two minutes. Please check the online status in the Device Management Cloud.

2. Linking the CloudRail.Box to the Device Management Cloud
In the next step you need to add the CloudRail.Box to the CloudRail Device Management Cloud. This is the place where you configure and manage all your devices.
Create an Account
Please visit https://devices.cloudrail.com/signup to create a new account. After you filled out all necessary fields, an email will be send to you, which you need to confirm.
Link Your CloudRail.Box
Please log in to your account on https://devices.cloudrail.com, click on “Connect New Box” and enter the serial number of your CloudRail.Box. You’ll find this number on a label located on the right side of the CloudRail.Box. Moreover give the CloudRail.Box a name and short description to identify it later.
Alternatively you can just scan the QR-code with a suitable QR-code reader.
3. Update the Firmware (Important)
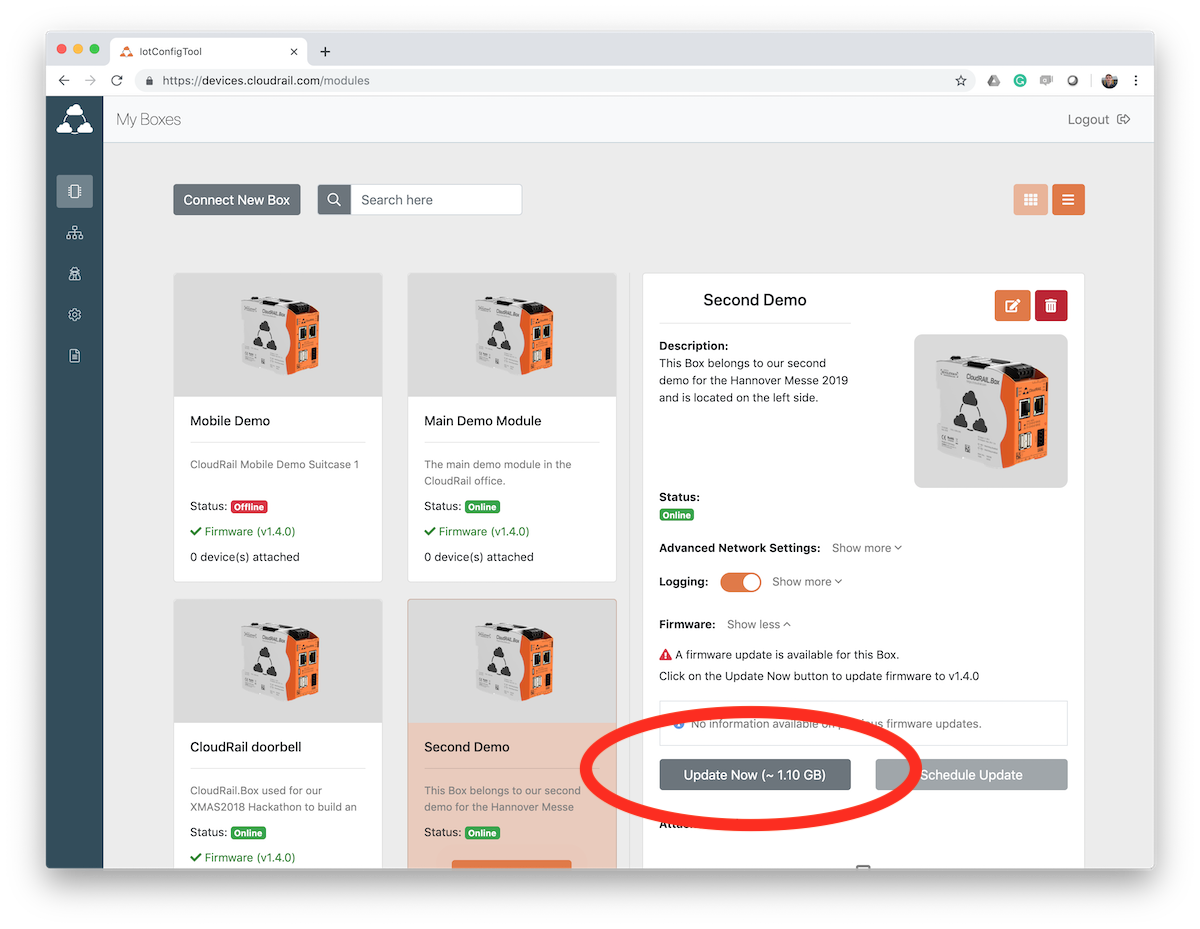
In case there is a firmware update available for your CloudRail.Box, it will be displayed now. Just click on “Update Now” to install it. This can take several minutes and the Box might restart multiple times.
Firmware updates ensure that your CloudRail.Box is always working properly and is secure.
4. Connect your IO-Link Master
Now connect your IO-modules to the right ethernet port (Field Port). A list of compatible IO-modules can be found here. Make sure to reset the IO-module to factory settings if it was connected to another system before.
Please select your IO-Link Master:
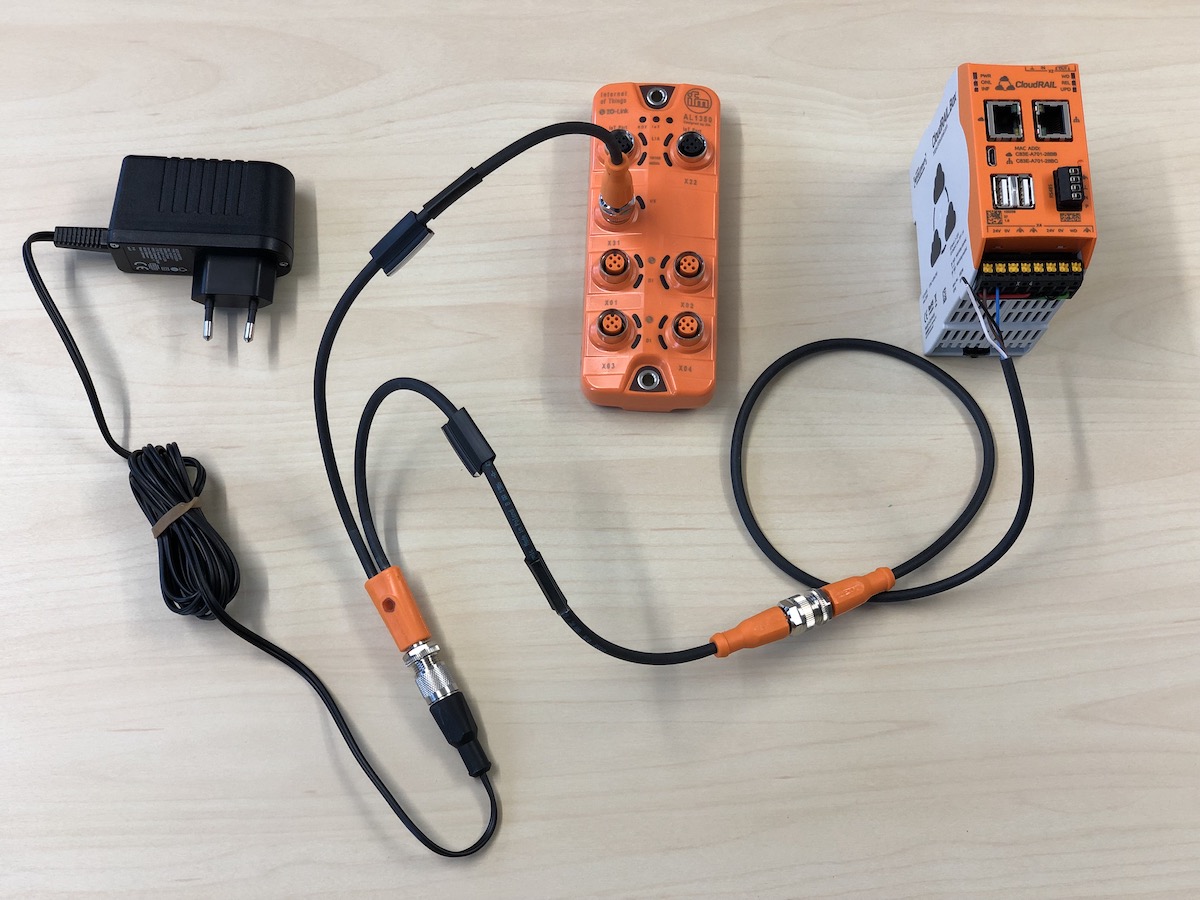
In the first step connect the CloudRail.Box to a suitable 24V power supply.
If you bought the IFM Starter Set, a suitable power supply is already included. Use the power cable with the two loose ends and strip the brown and blue wires.
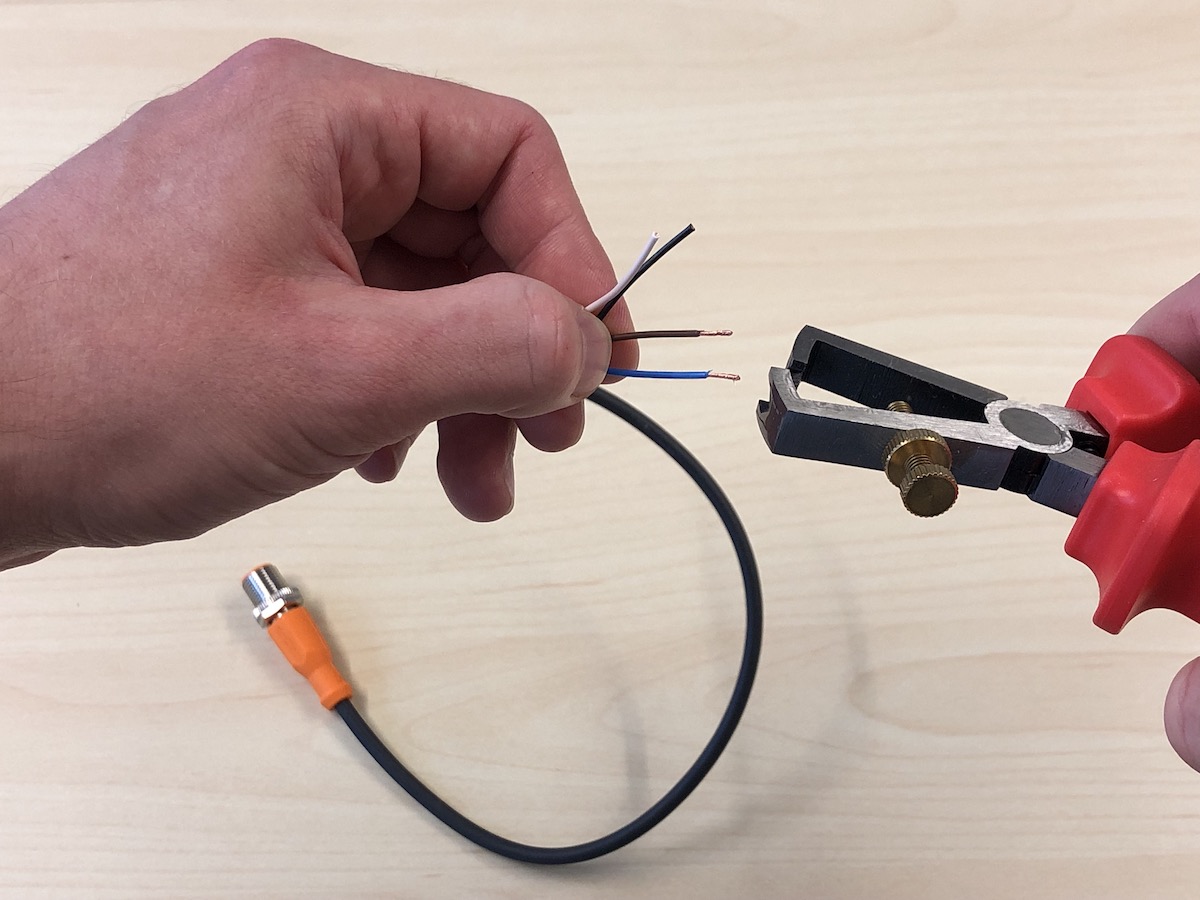
Connect the brown cable to the +24V terminal and the blue cable to the 0V terminal. Use suitable ferrules if necessary.
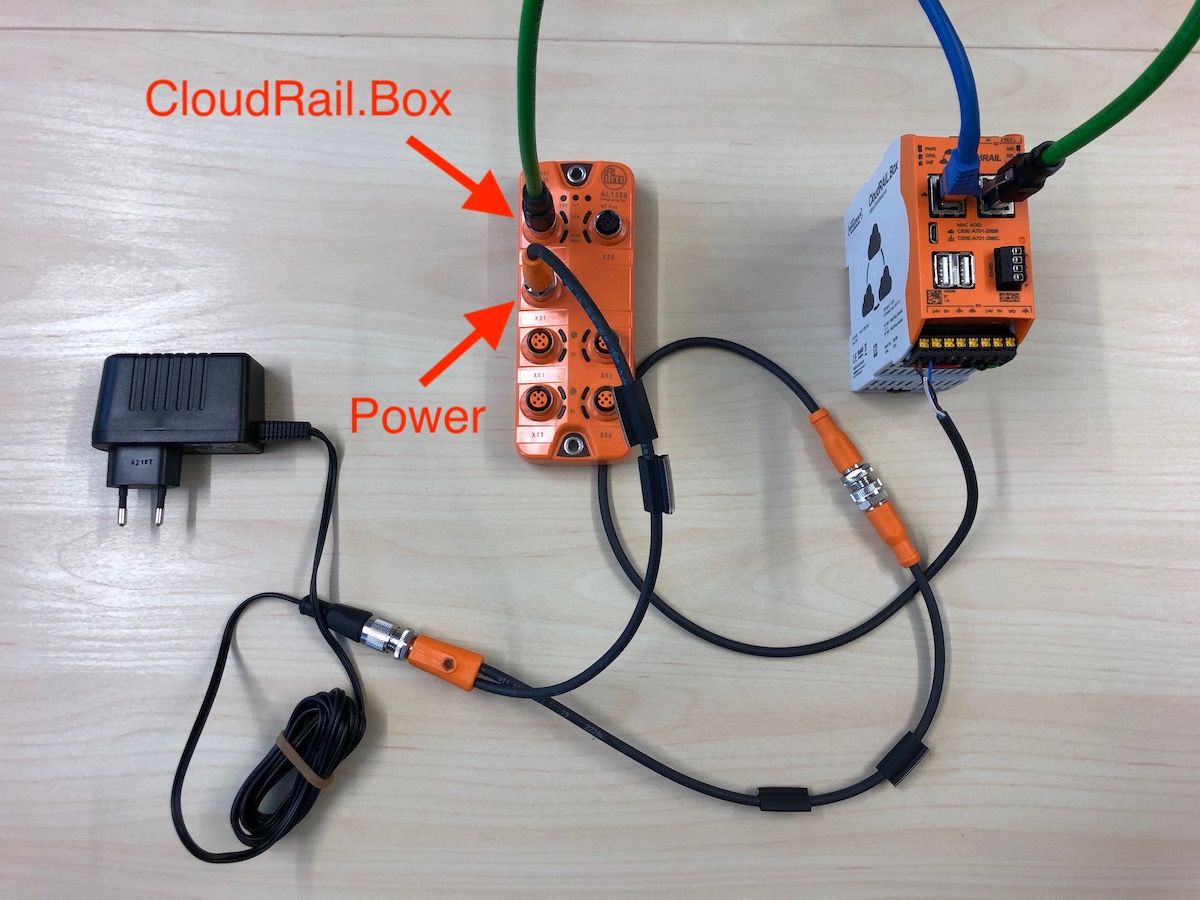
Use the Y-cable to connect both the CloudRail.Box as well as the IO-Link master to the power supply.
Now connect the CloudRail.Box to the internet using the left ethernet port (Cloud Port). If the CloudRail.Box is able to establish a connection to the Management Cloud, the “ONL” LED will turn green. This might take up to two minutes. Please check the online status in the Device Management Cloud.
2. Linking the CloudRail.Box to the Device Management Cloud
In the next step you need to add the CloudRail.Box to the CloudRail Device Management Cloud. This is the place where you configure and manage all your devices.
Create an Account
Please visit https://devices.cloudrail.com/signup to create a new account. After you filled out all necessary fields, an email will be send to you, which you need to confirm.
Link Your CloudRail.Box
Please log in to your account on https://devices.cloudrail.com, click on “Connect New Box” and enter the serial number of your CloudRail.Box. You’ll find this number on a label located on the right side of the CloudRail.Box. Moreover give the Box a name and short description to identify it later.
Alternatively you can just scan the QR-code with a suitable QR-code reader.
3. Update the Firmware (Important)
In case there is a firmware update available for your box, it will be displayed now. Just click on “Update Now” to install it. This can take several minutes and the CloudRail.Box might restart multiple times.
Firmware updates ensure that your CloudRail.Box is always working properly and is secure.
4. Connect your IO-Link Master
Now connect your IO-modules to the right ethernet port (Field Port). A list of compatible IO-modules can be found here. Make sure to reset the IO-module to factory settings if it was connected to another system before.
Please select your IO-Link Master:
Connect the IoT port of the IO-module to the LAN2 port of CloudRail.Box Max(right ethernet port of your CloudRail.Box). If you want to use multiple IO-modules, just use a standard ethernet switch in between.
In case the CloudRail.Box/Box Max doesn’t find the IO-Link master automatically, please restart the master by unplugging it from the power supply while letting the CloudRail.Box/CloudRail.Box Max being connected to power.
The CloudRail.Box/CloudRail.Box Max supports all LioN-X Masters and LioN-Xlight from Belden/Lumberg Automation. The IO-Link Masters can be daisy-chained via the “X02”-port to add additional masters. Additional Masters will be powered via the “X04”-port. Otherwise a standard ethernet switch in between can also be used for connecting multiple IO-Link Masters.
LioN-X Step 1: Connect and Configure Belden LioN-X Master
Connect the IO-Link Master via Port X03 (24V) to a suitable power supply (for most cables: brown=+, blue=-, please double check with the respective manual).
Connect the Ethernet Cable (RJ45 to M12) via Port X03 to the LAN port of a laptop or PC.
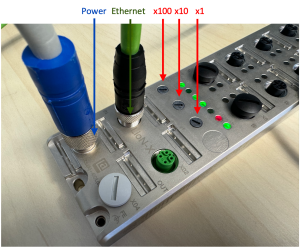
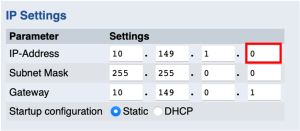
Manually change the last 3 digits of the LioN-X IP address to a desired one (e.g. 27) by turning the wheel clockwise
First wheel (from left to right) is 100, second 010 and third 001.
Example: 192.168.1.27
-> Set first one to 0
-> Set second one to 2
-> Set third one from 7
Remember: The last part (3 digits) of the IP address will be permanent! Choose a unique combination for your network!
LioN-X Step 2: Change IP address range of laptop to the LioN-X IP address range
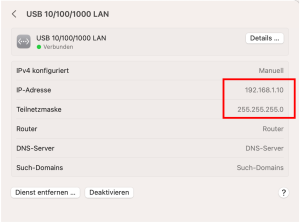
Open the LioN-X Web interface in a web browser of choice by connecting to the set IP address 192.168.1.xxx (for the previous example 192.168.1.27)
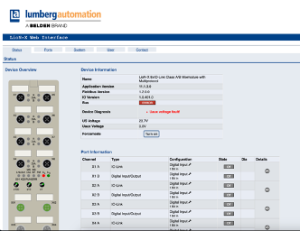
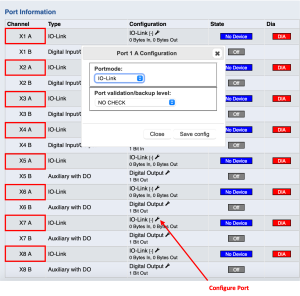
LioN-X Step 3: Change the Port Configuration to IO-Link
(only for X 1-8 A!)
Portmode: IO-Link
Port validation/backup level: NO CHECK
-> Safe config
-> Submit with Username: admin and Password: private (check remember password)

LioN-X Step 4: Change the IP address to a CloudRail auto detect supported one
After a reboot, the last 3 digits will be overwritten by the initial hardware configuration!
Reboot the LioN-X Master by disconnecting it from the power supply for at least 30 seconds (or until the LEDs no longer light up)
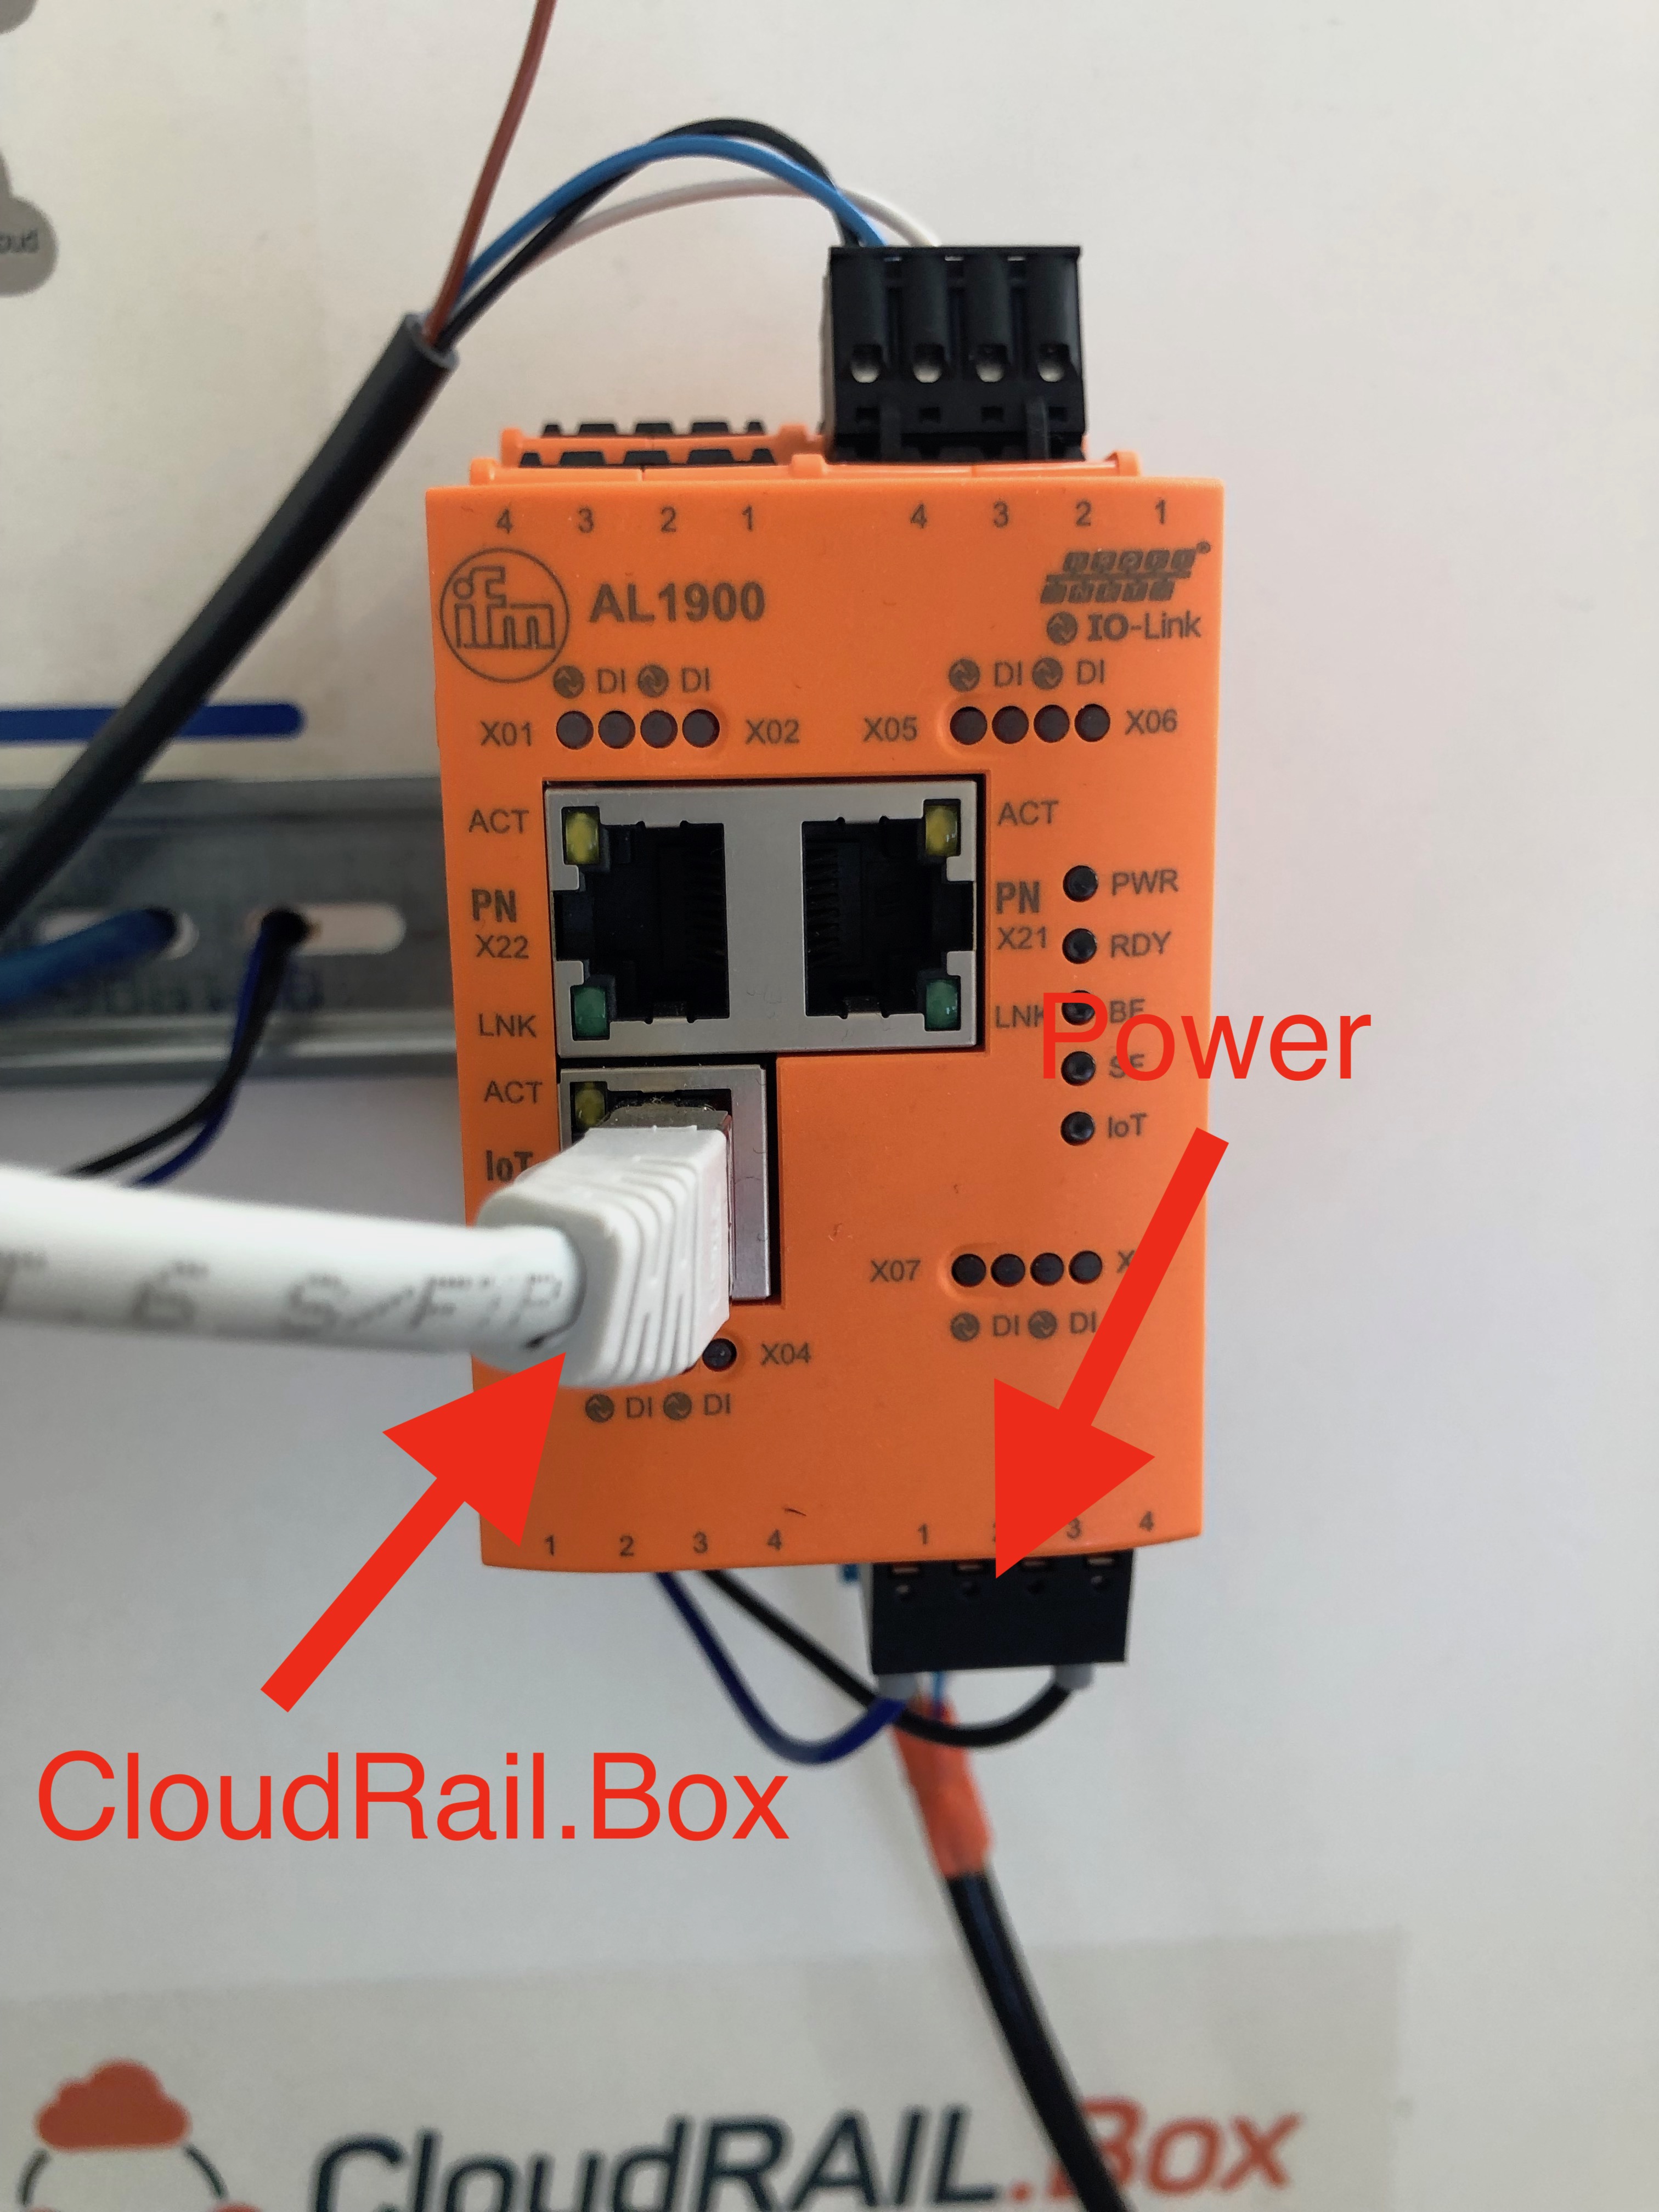
The CloudRail.Box/CloudRail.Box Max supports all IO-Link Masters of the DataLine Edition by IFM. A full list can be found here. Devices of the DataLine Edition have a separate network interface called “IoT”. This allows to establish a Y-path, so a parallel connection to a PLC and the CloudRail.Box/CloudRail.Box Max.
(Optional) IFM Step 1: Reset and Update Firmware
If the IO-Link master has been used in a different environment before, it might be necessary to reset it to factory settings first. If the CloudRail.Box/CloudRail.Box Max still can’t find the master, please also update the firmware to its latest version.
IFM Step 2: Connect Power and Network
Connect the IO-Link Master to a suitable power supply (for most cables: brown=+, blue=-, please double check with the respective manual). In the next step connect the IoT port of the IO-Link master to the LAN2 Port of CloudRail.Box Max(right ethernet port of your CloudRail.Box). If you want to use multiple IO-Link masters, just use a standard ethernet switch in between.
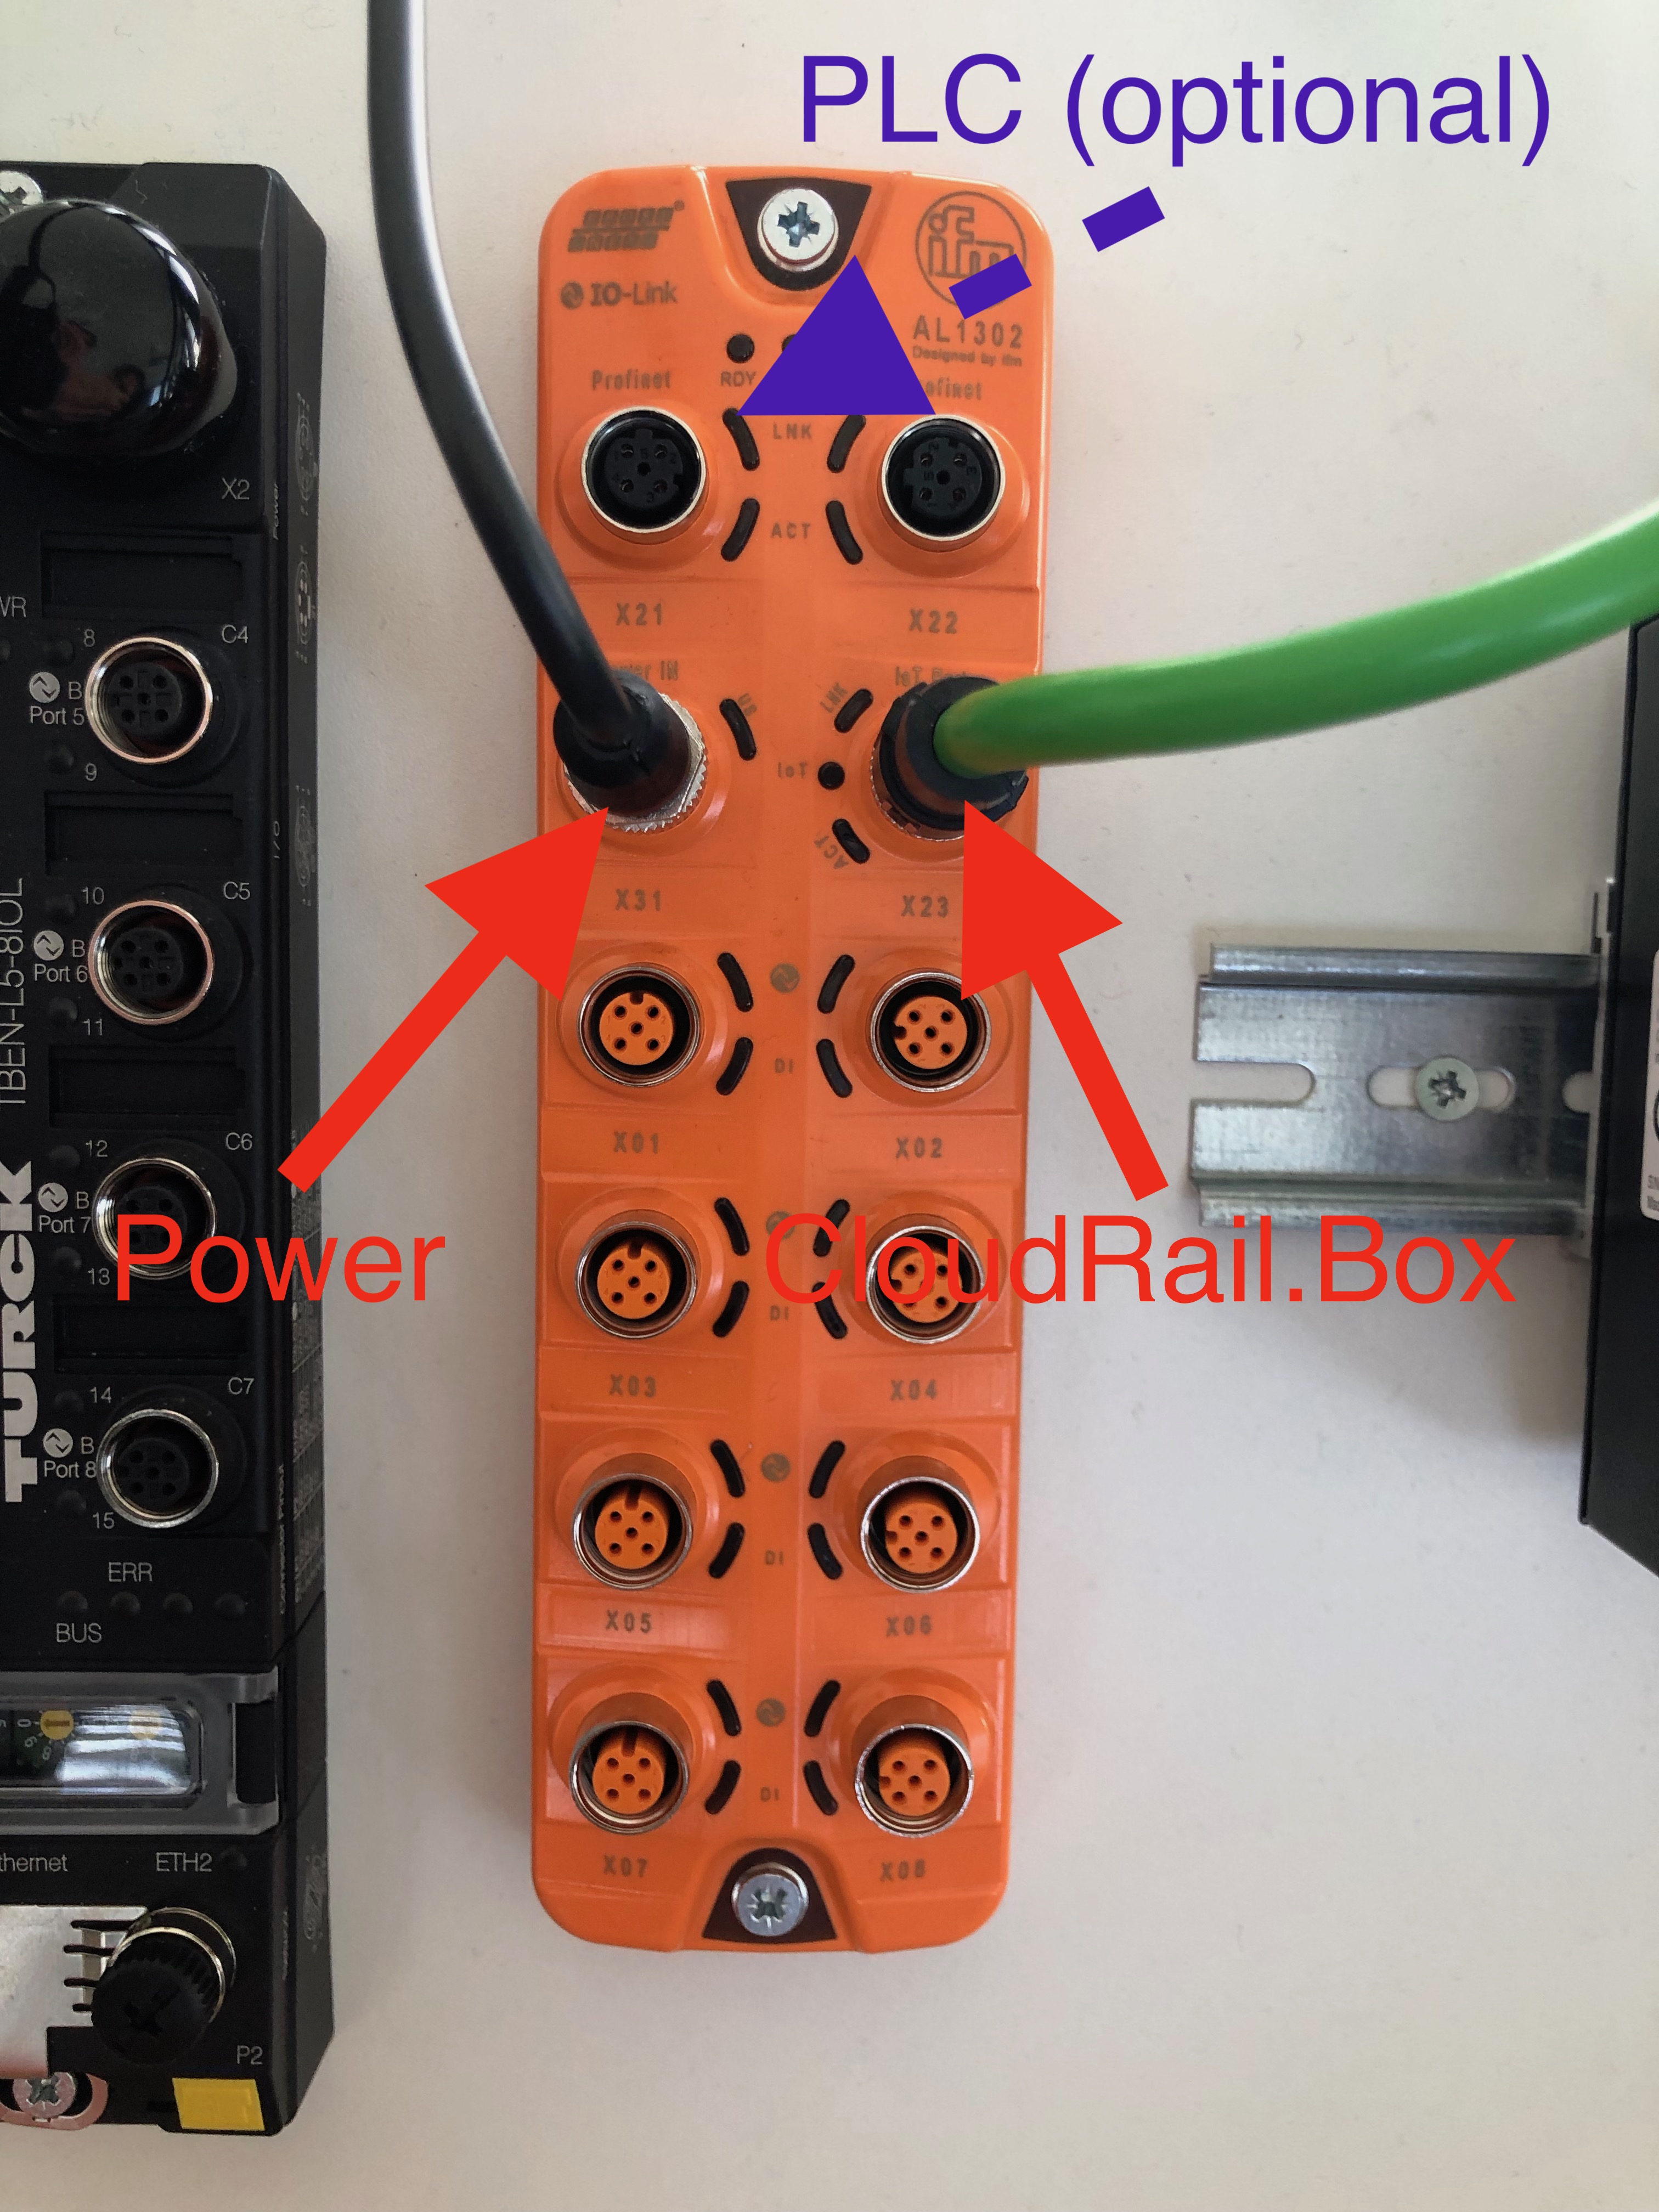
OPTIONAL IFM Step 3: Connect to a PLC
Due to the Y-path of the IFM devices, it is possible to connect the master to a PLC in parallel via the fieldbus ports. This is optional and has no impact on the CloudRail setup.
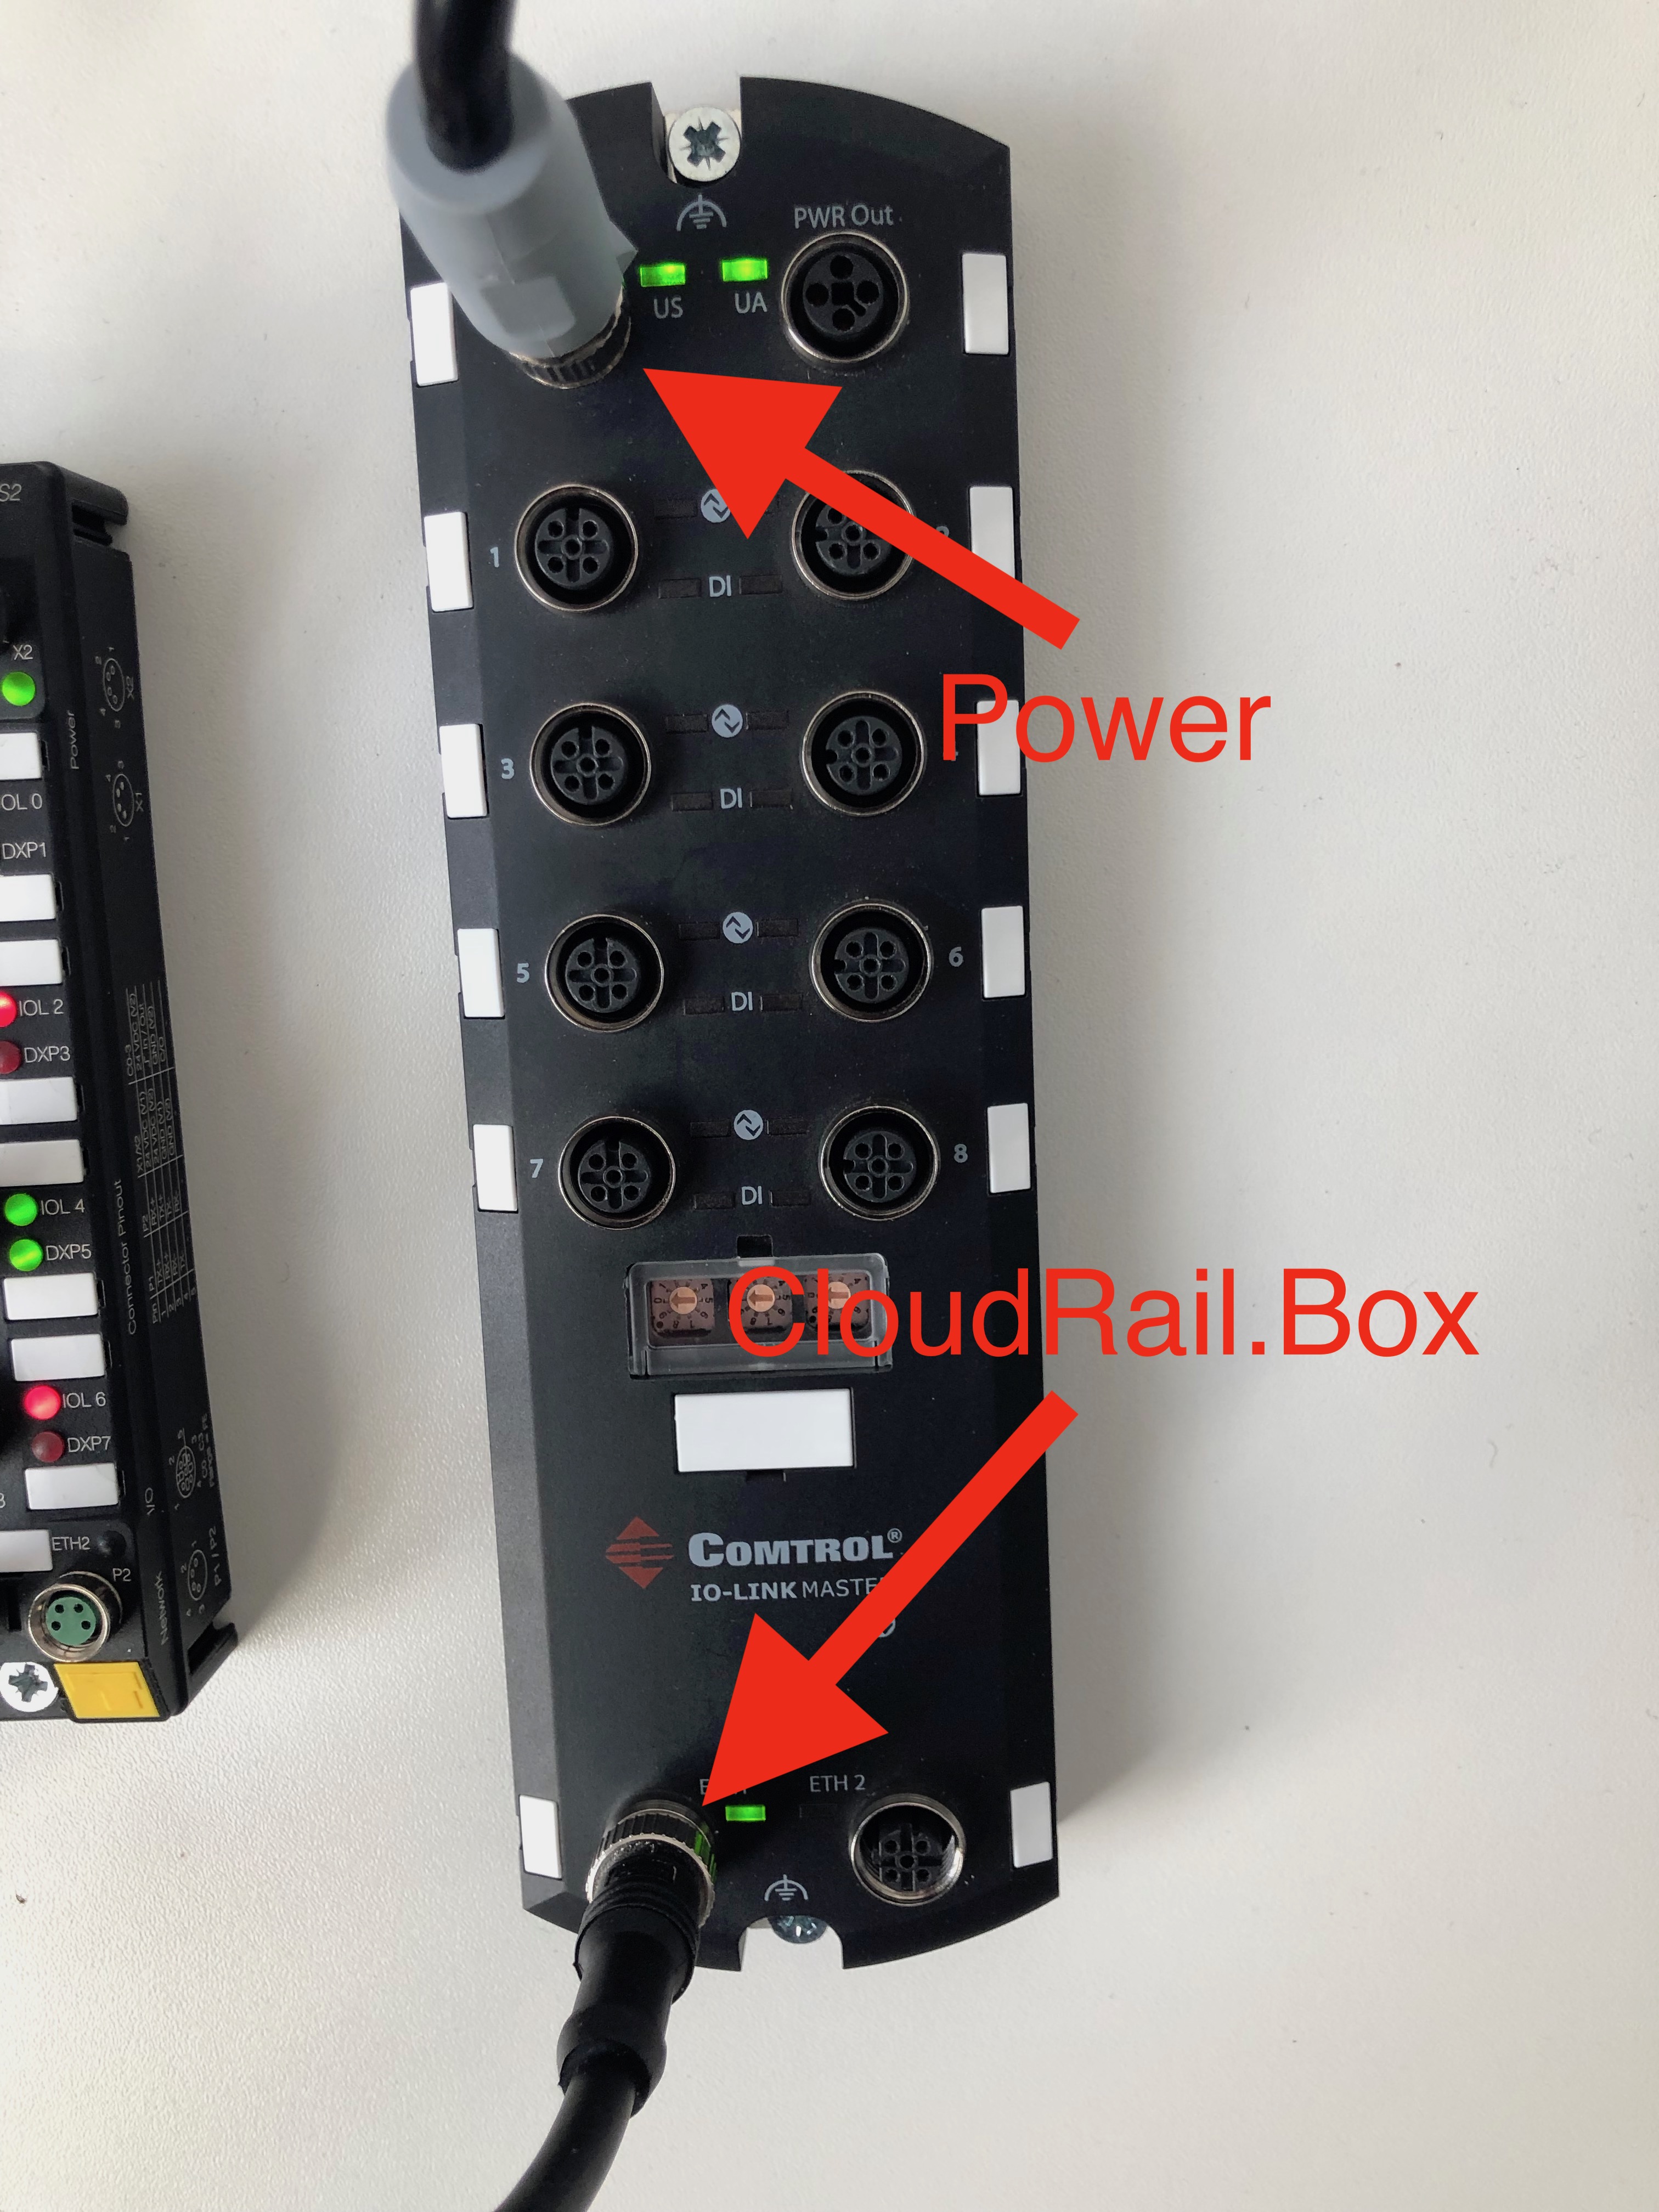
The CloudRail.Box/CloudRail.Box Max supports selected IO-Link Masters by Comtrol. A full list can be found here.
Comtrol Step 1: Reset and Update Firmware
If the IO-Link master has been used in a different environment before, make sure to reset it on factory settings first! If the CloudRail.Box/CloudRail.Box Max still can’t find the master, please also update the firmware to its latest version.
Comtrol Step 2: Connect Power and Network
Connect the IO-Link Master to a suitable power supply (for most cables: brown&black=+, blue&white=-, please double check with the respective manual). In the next step connect the “ETH 1” network port to the LAN2 port of CloudRail.Box Max(right ethernet port of your CloudRail.Box). If you want to use multiple IO-Link masters, just use a standard ethernet switch in between.
The CloudRail.Box/CloudRail.Box Max supports just selected IO-Link Masters of different vendors. A full list of supported devices can be found here. Contact us if we missed a crucial device.
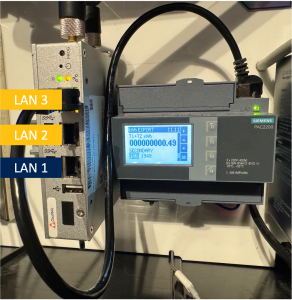
The CloudRail.Box and .Box Max supports any Smart Meter from any vendor that uses the Modbus TCP or RTU (serial) protocol. In this example we use the Siemens PAC2200 for demonstration purposes.
Connect the Modbus TCP Smart Meter from Siemens to the CloudRail.Box
- Please check the corresponding siemens device manual for correct wiring and the modbus register list
PAC2200-Series documentation
PAC3200-Series documentation
PAC4200-Series documentation
! Be aware of different version for different implementations (e.g. 5A vs 65A) - Connect the RJ45 cable from the Siemens device to LAN 2 or LAN 3 (Factory-Port) or to LAN 1 (Cloud-Port) of the CloudRail.Box.
Note: for LAN 2 the meter-IP has to be changed to an 10.149.xxx.xxx (e.g. 10.149.1.15) address - Set an unique IP-address, subnet mask and Modbus Port (502 by default) on the Siemens device. For PAC2200-devices you will find the Modbus settings by pressing
F4 -> Settings -> Communication -> Modbus TCP - Go to Documentation DMC – Modbus TCP for integrating the modbus device to the CloudRail.Box inside the DMC
The CloudRail.Box and .Box Max supports any Smart Meter from any vendor that uses the Modbus RTU (serial) protocol. In this example we use the Schneider Electric iEM2150 for demonstration purposes.
Step 1: Connect the Modbus RTU Smart Meter from Schneider to the CloudRail.Box
—– Coming Soon (tests not done yet) ——
5. Link Your Cloud Platform to the Device Management Cloud
By giving the Device Management Cloud Access to your Cloud Platform via the API, you will be able to provision new devices (sensors) automatically. In case you prefer to add each device manually to your cloud platform, you can skip this step.
Tutorials of how to connect your Cloud Platform to the Device Management Cloud, can be found at devices.cloudrail.com/documentation.
6. Your First Connection
To connect a sensor with your cloud platform, go to the overview screen, select the respective CloudRail.Box/CloudRail.Box Max and click on “New Connection”. Just follow the steps afterwards.
Any questions?
Feel free to contact us at support@cloudrail.com